Showing posts with label Raspberry Pi. Show all posts

Wednesday, April 13, 2022

Coolest Projects from Raspberry Pi #MakerEd

If you are looking for a fun way to bring a design challenge to your students, please take a moment to check out Coolest Projects from Raspberry Pi.


Coolest Projects provides all of the information a student and a teacher needs to be successful. The mentor guide really helps the teacher through the process. I love the student guide that was created that helps walk the students through the design process. From ideation, creation, testing, and reflection, the student goes through the entire process following the guided steps

Whether creating something using Scratch or something that requires physical hardware, there are plenty of different categories that students can submit their project to for consideration. I will be rolling this out to my 6th grades in the next week and I can't wait to see what they come up with for Coolest Projects

The deadline for sharing the projects for judging is May 11th. I am looking forward to seeing all of the amazing projects this year. 

Hugs and High Fives, 

N Provenzano

Wednesday, June 23, 2021

Interactive Fiction with Python! #MakerEd #Coding #ISTE21

Thanks to everyone that made it to the webinar. I was able to take the recording and add it to YouTube. You can watch it below. Feel free to share it with your students and with others around the internet. Here are the links to the resources used.

Trinket.io

Raspberry Pi Tutorial

My game with advanced elements


Here is my game I made. Press play to start.


 If you have any questions, please feel free to reach out and we can connect.

Virtual Hugs and High Fives,

NP


Wednesday, May 30, 2018

Making With Purpose #MakerEd

Last week, I published a post on Maker Fatigue. I felt like I was in the spot where I couldn't think of anything to make. It was frustrating because I have spent so much time working with students and their projects, I had the motivation /want to Make, but no ideas.

As I reflected more on the feelings, I decided to take the time and clean up my workspace at home. My space has been dormant the past few months because I have been so busy at school and it looked a bit sad. Cleaning up the space was very helpful because a my organized space can sometimes help me see things more clearly. Is that weird?

During the cleaning, I came across a mini thermal printer I bought over a year ago for a long forgotten project. All of a sudden, something just clicked in my brain. I should make a Raspberry Pi powered camera that prints the pictures on the thermal paper. I got all excited and started researching how this would be possible. Not surprisingly, there were some great examples out there already and they will be perfect to help guide my creation. I had a purpose and I was ready to get started. When it comes to Making in school, are we giving students a sense of purpose with their making?

When students are given a chance to make, are they just thrown in a space and told to make something? That would be frustrating for someone who just doesn't have a sense of purpose for their creation. You spin your wheels and get frustrated because you want to make something, but nothing seems to drive you. How much time is given to students to find a purpose or how much time is spent helping students explore what that means? I felt this way about coding as well. Just sitting and writing lines of code for a game is not going to truly inspire someone to become a coder. Learning to code to make a project that you want is purpose driven learning. When I coded my first lines of code, it is because I wanted to make that LED turn on when I pressed a button. I knew if I learned that, I could make a button do whatever I want. That was my purpose, my drive.

As I think about our makerspace next year, I need to make sure that there is something in place to help students with finding purpose in their making. It could be as simple as wanting to make something beautiful with paints to want to code their first robot. Not matter what the purpose is, as teachers, we need to make sure we help the students find it or recognize it as a driving force in their making.

I'm not sure what my thermal printer/Pi creation is going to look like,  but I'm excited to see what I will learn along the way, and that is my purpose.


(Editor's Note: If you are reading this and are thinking of the movie, The Jerk, you are not alone.)

Wednesday, October 4, 2017

Zombie Protection Team Challenge #MakerEd

One of the many cool things that Raspberry Pi does is run a Pioneers Program. This program is designed to challenge groups of young students in the UK and Ireland to use Raspberry Pi to solve a specific problem. It has been very cool to watch these students create very fun and exciting projects. The only downside of the Pioneers program is that it is currently unavailable outside of the UK and Ireland. :-(

The newest challenge was released a couple of weeks ago and it is a zombie focused challenge. Students need to create devices to help protect humanity against the zombie hordes terrorizing the world.

"This project sounds amazing and I really wish our students could do this!" That is what I thought, then I thought, "Why can't my students do this?"

While we might not be able to enter the competition in the UK and Ireland, teachers and students in the US can still have some fun with our students and build some fun devices and share them here. A

After chatting with Dave Quinn from MA, we decided to put together our own teams and have them build some fun devices with Raspberry Pi and share.

Then I thought, "It would be cool if more people joined and had students creating awesome things!"

So, I have put together some information if you are interested in joining the fun and having student groups create devices using Raspberry Pi to protect against a Zombie Apocalypse.

The challenge will run until December 22.

I'm also working on a fun digital badge students can receive after completing the challenge and, possibly, a sticker they can proudly display on their device.

See the link below to register your team. Please do so by Friday October 13th to ensure your team has enough time to design and build.

Team Registration 

Once you have registered your team, you will receive an email with info you need to get things started. If you are curious about the overall project, please watch this great video by Raspberry Pi that explains the challenge to the Pioneers.


Tuesday, August 8, 2017

It Started With An LED #EdChat

One of my most exciting moments in the Maker world was when I made my first LED blink at Picademy. I was playing with a Raspberry Pi for the first time and I had no idea what I was really doing. I was following the directions and trying to keep up. Then, I made the LED turn on and then I made it blink. Here is how I felt about it,


From that moment, I was hooked. I had the itch to keep learning and to dive deeper because of that experience. I am not sure if the blinking LED was supposed to be the skill that hooks a Maker, but it hooked me. I think this needs to be kept in mind for teachers out there. 

We want our students to explore the world around them to see what they can learn and love. We do not have any idea what will be the lesson, book, comment, or idea that will set them off on a journey of discovery, but we need to make sure we give all of our students an opportunity. 

As the school year starts, there will be plenty of time to focus on the curriculum that needs to be covered. I hope as educators, we think about the experiences we want to create for our students. Those are the things that can alter their trajectory for the rest of their life. For me, Picademy launched me into the world of Raspberry Pi and Making that has led me to great learning and sharing with a passionate community. That has allowed me to connect with my students and pass the awesomeness to them. Life is made up of experiences and school should be designed to give students the best learning experiences possible. 

What experiences do you want your students to have this year?

Friday, August 4, 2017

An Underwater Pond Camera with @Raspberry_Pi #MakerEd


I was out back and I was looking at my pond like I usually do most Summer days. Here is a shot of my pond. I built it all by myself. One of my earliest adult Maker projects. 


As I walked by and noticed how clear my water had become since changing filters, I thought it would be cool if I could see where my fish like to hide. I broke a few large Terra Cotta pots in half and placed them in the pond to create little caves for the fish to hide from raccoons and a white crane that hangs in the backyard. I immediately that that a my Raspberry Pi Zero W attached to my Dremel 3D printer would be perfect for this project. Here is a link to elinux.org site that walked me through the code to create a Web Interface for my Raspberry Pi Camera

Since I had the program up and running already, I needed to come up with a to power the Pi and to keep it dry. After a quick run to the store for some Diver grade waterproof bags and battery pack, I was ready to put together my underwater Pi.


These are some photos of the camera in the bag with the battery pack. I also added this little LED light. I think it helped a bit.


Here is the bag floating on the surface of the pond getting some great shots of the fish swimming around. If I wanted, I could weigh the bag to the bottom of the pond (3.5 ft), but I'm not sure the wifi signal would be that strong.

Here are a couple of videos I posted to Instagram. (Note: Ignore the Time Lapse stamp. I forget to change that before recording.)

A post shared by Nicholas Provenzano (@thenerdyteacher) on


This entire project was easy because I had a Pi set up for video and timelapse. I just needed to take it and make it waterproof. This was a fun project that I can really explore more deeply by thinking about building a motorized boat around the floating bag that would allow me to steer it around the pond to specific areas and get really tight shots.

Hugs and High Fives!

NP

Tuesday, January 24, 2017

GIF Camera Fun #MakerEd

For those who have been harrassed on my Twitter feed with tons of random GIFs, here is the post that explains what I was doing for the past couple of weeks.

In a recent edition of MAKE:, I saw this really cool project for a GIF Camera using a Raspberry Pi Zero. You can find all of the details for that project here. It took me a few hours to wire everything up, but it was pretty easy to do with the soldering skills I've picked up over the past few projects.


I used my Dremel 3D40 to make the case for the camera. I have a spool of glow in the dark filament that I thought would be fun to use for this project.


I had fun with my camera and posted a few GIFs of students being silly.


I started to tinker with the idea that it might be cool to add different lenses to the camera, but I could not find anything that would just clip over the camera lens the way I needed. So, I started designing.


I designed over and over again and used the Dremel 3D40 to print many different prototypes until I finally found the right size for everything.


Here is a link to my Tinkercad file and here is the lens kit I bought from Amazon.

This was just another fun project that would be great to bring into your Makerspace. Total cost without the lens kit is around $50. The most expensive piece was the Pi Camera. You can tons of fun with the design of the case and hack that as needed and possibly add other features for more advanced makers. If you have any questions, feel free to leave them in the comments and I'll reach out.

Tuesday, August 9, 2016

Photo Booth Fun with #RaspberryPi #MakerEd

Over the past week, I've become a bit obsessed with creating a photo booth. I saw this very cool article in Make: Magazine and thought I could do that. Well, it turned out that that I could not do that. For whatever reason, I was having serious trouble getting the code to work and it was becoming a headache. So, I turned to The Google to find a different approach to creating a photo booth.

Materials:

Raspberry Pi 3
Micro SD card - The larger the GB, the more pics it can hold.
Monitor - I used the 7" Raspberry Pi Touchscreen, but any screen will do.
Tactile button
Wire to connect Pi to button
PiCamera

I found some interesting resources and wonderfully helpful people online and they helped me put together a slightly different photo booth. I settled on a great code written by jallwine that was shared on Github. This was a great starting point for me to see what the photo booth could be and I could tweak the code to add different things. Not only did he have amazing code, but he helped me when I got stuck trying to tweak his code. Jallwine is the perfect example of how awesome the Maker community can be. He didn't have to help me with his code that was a few years old, but he did it anyway. 

I added a button line so the photo booth would work with the press of a button. I found a version I could use on Raspberry Pi's website that was helpful. The idea of using stop motion as the trigger for the camera made sense to me, so I dropped that in there. 

I also wanted to add a countdown clock so people know when to expect the picture. I really struggled with this because I was approaching the problem from the wrong angle. I was looking for a code to create a timer, but that was overly complicated. Instead, I used the camera.annotate_text line to create text over the picture. For the text, I used numbers that lasted for one second. That created the timer for me. It worked great!

I didn't use the the next parts in the final code, but I figured out how to use random effects on the pictures so they could be really silly photos. The regular photo is currently in, but I could quickly drop it in. You can find out how to do that on Raspberry Pi's website.

Next, I wanted the pictures uploaded to the Cloud so I could grab the when I wanted and share them with others easily. I found a great code for DropboxUploader on Adafruit. I took the code for something different from a photo booth and was able to spin it into a nice addition to my project. I felt super cool being able to put this together. 

I added a few more lines so that the Camera Preview would say "Ready" when it was ready to take pictures and "Processing" when it was formatting and uploading to Dropbox. 

When I was finally done, I had a full photo booth system that will take 3 pictures, duplicate them side by side, upload them to Dropbox, and start all over again. 

I used the Raspberry Pi 7" touchscreen because it was easy to use everything together. You could use any HDMI connected screen you wanted. It could be cool to connect to a large TV screen at family functions are large events so people can really see the images. 

The final step for me will be to create a case to package everything together so it can easily be moved around from place to place. I have a big red button ordered from Adafruit. I can place that on the box and people can give that a push and have their pics. I was thinking of  simple box that had a dry erase or chalkboard front that would allow people to personalize the booth based on the event. 

Here are some pictures of what I was able to put together. 


Sunday, July 17, 2016

Retro Rotary Phone @Raspberry_Pi Project #Picademy #MakerEd

I was cruising Ebay yesterday and I stumbled across this interesting rotary phone. It's completely self-contained in this cool box. If something is old and self-contained, I always think of different ways I could possibly hack it. I was able to win the auction for this phone for $10.50. The shipping is going to cost more than I paid for the phone. Total: $28.00


I'm thinking that I can hack this guy with a Raspberry Pi 3 and have it set up to stream music. To do this, I will replace the speaker in the headset and the receiver with another speaker so the handset becomes the speakers for the Pi. What I really want to do is have the button that the receiver releases when it is picked up be the on/off button. In theory, that should be a simple GPIO connection, but I'm not 100% sure on that. Using the receiver button saves me from having to install a separate button or running a python script on boot. I can easily add the microUSB port to the phone for charging. I could run it through the old phone port. 

I wanted to share the very beginning of this project because I thought it was cool and to ask for any suggestions on using a button to turn the Pi on/off. I'm happy to accept in coding help if you have an idea about the button. 

Monday, April 25, 2016

Raspberry Pi Jam at #ISTE2016 #MakerEd

I have been loving all of the cool Raspberry Pi adventures I have gone on since becoming a Raspberry Pi Certified Educator. I have connected with even more amazing educators and have learned so much more about coding and computing than I have ever hoped.

One of the cool things about Raspberry Pi is the community that surrounds this credit card sized device. It is an amazing group of people that love to code, hack, create, and share the cool things they are doing with Raspberry Pi. They organize events for people to get together and share their Pi creations and they have an awesome name, Raspberry Pi Jam.

During the Picademy, the concept of Jams was explained and some of us immediately thought about doing one at ISTE 2016 in Denver. After some hard work and ISTE being awesome and donating space and monitors, I'm happy to announce the ISTE 2016 Pi Jam! All are welcome to come and check out the awesomeness that is Raspberry Pi. If you have no idea what Raspberry Pi is, but you want to talk to people who do, this is the place for you. The event takes place in the Posterboard Session space on Monday June 27 from 5PM-7PM. If you are looking to learn more, please stop by and say hello and see what is going on with Pi.

If you are a Pi enthusiast and you have some awesome things you want to share with others, we would love to have you join us for the Pi Jam and share the awesomeness. Below is a Google Form for those of you who want to claim a space with a monitor to show your Pi work off and answer questions curious people might have.

Again, this form is only for those who want to reserve a spot to show of their Pi projects.


Feel free to spread the word and share the Raspberry Pi Jam love to everyone out there. 

Friday, April 8, 2016

Student Innovation #TEDEd #MakerEd

Part of being a TED Ed Innovative Educator is working on an Innovation Project. We are able to choose something to work on for the year and document what we have learned. I had a hard time thinking about my project and all of the other TIEs have amazing projects. I had to think long and hard about what I care most about and I decided that student innovation is important to me. I want to create more opportunities for Student Innovation.

The first way I tried to implement Student Innovation Projects is to use 20 Time. I gave one class the chance to work on any project they wanted. It went very well and students created some interesting projects they were passionate about. The one obstacle I faced was trying to find balance in helping too much versus not enough. I felt like some students could have used more support, but then there were times I caught myself helping too much. It feels like such a thin line, but it is something I see I need to continue to work on for future projects. 

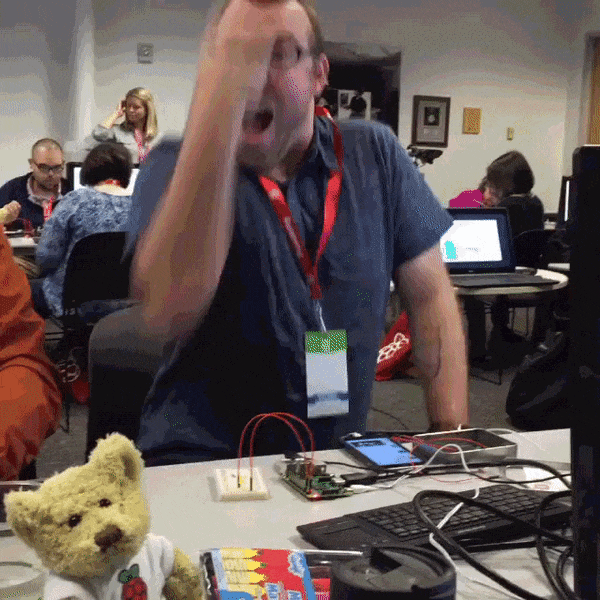
One project that came out of this group was a way for students to scan their ID card when they leave the room with s pass and scan when they get back to keep an accurate lot of who is in the room. The scanner is connected to a Raspberry Pi and sends the info to a Google Doc. Our Superintendent saw the student presentation and wants to see this piloted in our schools. The students are currently working on this as an Independent Study with my support. 

I really wanted to give students opportunities for innovation outside of my classroom. It is one of the reasons why I worked hard to create the Makerspace in our library. After becoming a Raspberry Pi Certified Educator, I thought it might be cool to see what students could do if they were given Pi and asked to identify and problem and come up with a solution. After a few weeks, the students blew us away. We had four teams and here is a quick recap of their projects:

Web-based application that will allow a person to turn on/off any device that is plugged into their system. It could be lights in your room or the coffee pot in the kitchen. Just login and turn them on or off.

A wifi based garage door opener that could eventually have a detector  that can notify you when it is opened or closed.

A wifi connected robot rover that can take pics and record video.

The winning project was a Raspberry Pi connected to a touch screen monitor that allowed users to enter in their medication and the times they need to take it. The screen then starts a countdown and will notify users when it is time to take their next but of medication. Future extensions will have text capabilities. This group has another member that worked hard on the code, but she could not be their because she had sailing practice. 

I loved watching all of these students share their projects and what they learned along the way. All of them talked about the failures and frustrations, but also the excitement that followed when they got it working. It was also fun to hear other students ask questions and offer suggestions for the other projects. It was a very nice collaborative atmosphere for the students and it all took place in our Makers Lounge. 

There were two groups that dropped out. They said that they could not get their projects working and did not want to present. Despite encouraging them to come out and share their work, they were no-shows. I wonder how much more support I could have offered those students. More meeting times or something might have helped. Getting feedback will help for next time. 

Overall, I think this was a huge success. This was the first ever STEAM competition our school has held like this and I think it got kids excited to do something different and see what they could learn along the way. It made me so happy to hear that students were teaching themselves how to code and learned so much along the way. You can't make students innovative, but you can give students the opportunity to explore and learn along the way. More often than not, students will create something innovative they never thought was possible. 

The Pi Teams
Winning Team: Noah, Simon and Eva (not pictured)

Monday, February 29, 2016

No Such Thing As Too Much Pi #Picademy

This weekend, I was lucky to be part of the very first US cohort of Picademy. My Pi journey has been relatively short so far. I only got into using Pi after watching students work with one for their 20 Time project. Heading into the event in Mountain View, I wasn't sure what to expect. Was I going to flat out embarrass myself with my overall lack of knowledge in front of all these Pi experts? Was I going to end up in a ball crying myself to sleep because I'm so far behind. I just didn't know what was ahead of me.

Well, I have to say that Picademy has been one of my best overall PD experiences. It is without a question amazing. Here are some of the highlights.

Friends!

I was lucky to know some of the people that attended Picademy. Some were part of my GCTMTV14 cohort. It was nice to connect with them and share stories on how things have been going since we left Mountain View 1.5 years ago. There were others that I knew through Twitter, ISTE, and other conferences. There were also friends I had not even met yet! We were all there to learn about Pi and we all had different skill levels and we were all there support one another.

GCTMTV14

Support!

I do not think I have ever felt as well supported at a workshop/event than I did at Picademy. The Pi experts managed to strike an amazing balance of letting you fail, helping you a bit, letting you fail, and guiding you to the correct answer while they walked you through WHY it was the correct answer. This is something I still struggle with in my classroom and this crew did it easily and did it with style.


A photo posted by Nick Provenzano (@thenerdyteacher) on


There were times when attendees would be able to help one another as well. I would be able to help someone with some Python code and someone would help me with the Twitter API. We brainstormed ideas together and encouraged each other as we tried to push our limits of understanding. It was such a great atmosphere of support that really made failing very easy and comfortable to do as we learned.

Skills!

I've got some mad Pi skills now. Seriously, I can now do things from memory that I never though possible. I was able to think my way through a project to make something do something else with code and I got it right (mostly). If you need me to make things blink fast or slow in Python, I'm a guy that can do it for you with some time and notes. :-)


In all honesty, Picademy spent the first day working on the skills that we would need to create our Hacking project the next day. It was a very nice and easy transition from learning to applying. It's not surprising since so many of the Pi experts were former teachers. They understand the learning process and were able to impart skills to us and then support us as we struggled to implement those skills.

Project Based Learning!

Yes, PBL at Picademy! We did not just sit and watch slides, we had our Pi kits and were given tools to use to make it happen. We watched and then we applied what we learned to the project in front of us. We then took our new found skills and applied them to a project that was meaningful to us. You found partners to work in groups to work on projects that you were both passionate about. It was awesome!


Community!

I felt like part of a much larger community that embraces the hacking and creative lifestyle that I want to impart to my students. Raspberry Pi folks are dedicated to creating and sharing. The Raspberry Pi Foundation is about using technology to balance the playing field for all people in the world and they think their credit card sized computer can do that and I have to agree with them. Raspberry Pi allows anyone access to a simple computer that can help you master coding skills that can advance you in life. The community around Pi is incredible and I feel very lucky to be part of it.

Raspberry Pi encourages Pi enthusiasts to get together and share their love of all things Pi. In this spirit, people get together and host Raspberry Jams. A handful of us from this Picademy Cohort are already working with people to bring a Raspberry Jam to ISTE this Summer. No idea on how we are going to do this, but we really want others to connect and share their ideas regarding Pi in classroom and ISTE is a great place to do this.

Sign Up!

Raspberry Pi Academy was an amazing experience and I want to encourage everyone to get out there and get their hands into Pi and see what you can create and then take that experience and share it with your students. If you want to attend the next Picademy USA, check out the link and submit your application so you can get a cool certificate and pin like these.


Monday, January 11, 2016

Getting Nerdy with Arduino #MakerEd #EdChat


I've already spent some time with Raspberry Pi, so I thought it was time to take the next step and see what I could do with Arduino. For those who do not know, Arduino is a general purpose microcontroller that can be easily programmed. It can connect to the Internet, move motors, turn lights on and off, detect motion, and anything else you want it to do with the correct code and add-ons. With the right amount of time, I can set up my Raspberry Pi to make the Arduino do things. The possibilities really get me excited.

The first thing I needed to do was get used to using Arduino and some simple projects. My first one was making a LED turn on. It was just plugging a few things in and running the code, but it was cool to watch it turn on because I did it. It was cool.
A video posted by Nick Provenzano (@thenerdyteacher) on

I did a few more projects over the course of the next hour that involved LEDs. I made a dimmer and programmed one to blink and different intervals. It was cool to plug the pieces in and see the code on the computer screen. I was learning how all the components line up to run power to each part. Again, it was very cool.
A video posted by Nick Provenzano (@thenerdyteacher) on
I hit a wall when it came to setting up the LED screen. I was supposed to be able to plug it all in and I could then have the screen read whatever I want. I got the screen to light up, but no words. Blurg.

I like that I hit the wall. I want the challenge. I want to know why it wasn't working. I want to spend hours looking at the diagram and seeing where I went wrong. I know that once I learn these basics, I can start to do bigger things. No joke, but I could build a robot. 

For $65, I was able to get a nice sized starter pack with 20 projects. From there, I can expand and tweak these basic projects and turn them into something bigger. The Internet will provide me with even more ideas when I'm ready.

Now, this is just one nerdy teacher having some fun on a Sunday afternoon. Imagine setting up these projects for students in your class or in the library during lunch for students interested in giving these a go. If I want to create a space where all students can explore the world of Making, I need to be familiar with some of the tools that are out there. 

You might have thought Arduino and Raspberry Pi would be cool, but you don't know where to start or are afraid to try something out of your comfort zone, but I'm here to tell you if you do not take the risk, why will a student? Put yourself out there and be the Maker you have always wanted to be.

Stay tuned for more Arduino and Raspberry Pi updates in the near future.

Hugs and High Fives,

Nick

Friday, January 8, 2016

Nerdy Pi #MakerEd #RaspberryPi

It all started with a student project and it has led me to dive into the world of Raspberry Pi. Students are working on a way to scan student IDs so they can come in and out of the classroom without disrupting the teacher to sign a pass. They chose to use a Raspberry Pi. I had never used one and had only heard about them from friends on occasion. I was blown away at the work they were doing, so I wanted to learn as well. So, I ordered a Raspberry Pi kit from CanaKit. I ordered the complete kit so I could have wifi and really see what I can do with it. I was so excited when it arrived. 


I quickly went online and started to look at the different things I could build with my new Raspberry Pi. I found a few different sites that lets you turn your Raspberry Pi into a video game emulator. The best one and the one that I ended up using is called RetroPi.

I was shocked at how easy it was to set up! It was just loading the file on the SD card and then putting the SD card into the Pi. From there, I was able to place games on the Pi. Now, it is not ethical or legal to download games, ROMS, that you do not own and place on an emulator. There are plenty of open source games our there that you could download and play on your Raspberry Pi that are worth looking at. Here is one of many different sites you can check out for all of your gaming needs. If you want to take some of your old games gathering dust in a box and place them on the Raspberry Pi, here is a great article that can show you how to do that. 

After plugging everything in, I was able to play some fun games. However, I had a Raspberry Pi exposed on the floor with wires all over. I felt like I needed to find a case for everything. This is where my (limited) 3D Design Skills come in handy. I went online and found many different case possibilities for the Pi. The one I decided to use and alter was a great design that looks like an old Nintendo. I downloaded the file and uploaded it to Tinkercad to make some edits. I called it "Raspberry Prov". Here is what I was able to come up with for my Pi. 


I found a couple of USB SNES controllers online for about $8 and set them up to use for the ROMs I downloaded. It was tons of fun. I was able to bring it over to my brother's house for Christmas and show him some games. It was fun to design the case and it was fun to download the emulator, but I was looking for a bigger challenge. I was hungry for more Raspberry Pi!

For my next project, I went to Adafruit and started to look around at some of the projects they had there. Adafruit is a great resource if you are looking for supplies to Make cool things and/or projects. I found a great project to make a portable touchscreen Raspberry Pi. I needed to get a bunch of supplies and was very nervous because I do not have experience soldering. Here is what I was able to do over the course of a couple of hours. 


I encountered some problems trying to get the correct software on the SD card and the screws I ordered were not the right size OR I did not design the case with the right size screw holes. They sort of fit, but not very well. Despite those issues, I was able to say I created a small touchscreen computer! I never thought I would be able to do this. 

The main reason I'm sharing these two nerdy adventures is because I feel strongly that we need to give our students more opportunities to do things like this. The feeling of making something from scratch, or using Scratch, to create something is an amazing feeling. I never thought I would be able to do any of this. Math and Science were subjects I always thought were out of realm of understanding. I wish I had these types of tools growing up. I would have felt more confident trying new things if I could have gotten my hands dirty and tried to build things. 

As educators, we need to look at our ever changing world and see what we can do to support our students and give them access to tools to help them in their educational journey. I see so much value and potential in using Raspberry Pi in the classroom and Makerspaces. 

I'm very excited about what the future has in store for me and for the students at my school as I work to introduce Raspberry Pi. My next adventure is going to be focusing on using Raspberry Pi and Arduino to automate something awesome. 

Until next time!

Hugs and High Fives, 

 Nick

Thursday, January 7, 2016

Moving To The Side: Student Project Support #PBLChat #PBL

I've been a big advocate for Project Based Learning. I love watching students create something brand new and share it with the class. I love the look on their face when they finally figure something out and are excited to let everyone know. One of the hard parts of being a super nerdy teacher is getting out of the students' way and letting them explore the project at their own pace.

I currently have students who are working on a project involving Raspberry Pi. I have never used Raspberry Pi before and was eager to learn along with the students as they worked on the project. As they encountered problems, we worked together to brainstorm solutions. At one point, it hit me. I'm  not a member of the project. While it is fun for me to help the students work on something that interests me, I can't be the one that does the Google search to find out why the wifi is not connecting. I can't be the one to figure out why the SD card will not format on the Mac. I love  a challenge and want to answer questions and solve problems, but they need to be my problems, not the problems students are having on a project.

I'm not saying that students should never receive help from teachers. That would be crazy. I'm suggesting that it is important to remember that there are times where it is important to let the kids try and figure it out and explore the possible solutions on their own instead of doing it for them. When I realized I was helping too much, I simply stood up and told them that I trusted they could  figure it out and let me know when they solved the problem.

I think students need to know that their teacher trusts them to solve their own problems and not just do it for them because it is easier. That trust can help build confidence in students and encourage them to try different things and look to tackle larger problems. Some people will call it grit or some other buzz word that is popular, but it is just a simple matter of letting kids do the work and learn from their failures and their successes.

Even though I am super excited about their project and I ended up buying my own Raspberry Pi kit (posts coming soon), I need to remember that their learning journey needs to come first and then I can learn from them when they are done.