Showing posts with label Arduino. Show all posts

Monday, February 15, 2016

Exploring Code and @Arduino with @DuinoKit #MakerEd

I've been playing with my own Arduinos for a few months and have come up with fun projects based on sketches I've found online and books I've purchased. I've even designed my own case to hold my Arduino while I built projects around it.


I am always looking around for new ideas and I really wanted to find something different that would really allow me to explore using Arduino in many different ways and also be able to show students how it can be used. Luckily I was able to find a very cool piece of technology on Amazon that looked amazing!

The DuinoKit is an all-in-one Arduino Discovery Kit. It has all of the parts you would need to try new things with your Arduino. It is set up with an Arduino Nano and everything is all wired together in the briefcase. All the user has to do is attach the wires to the specific parts and run the code. Here are a couple of examples that I have been able to put together.


In this video, I was able to connect the LED to the light sensitive cell. The darker the room, the faster the blinking. I actually deviated from the sheet that DruinoKit provided and connected to a different LED and then figured out how to add the push button on my own. One of my first projects on the kit and I was already hacking. :-)


A photo posted by Nick Provenzano (@thenerdyteacher) on

Here is a simple connection and code that showed me the temperature and the humidity in my classroom. Just connected a few wires and ran the code. The students that came in the room that is was very cool. I took some deep breaths and blew on the sensor and watched as the humidity and temperature increased on the LCD screen. Again, it was very cool.

I had some questions about connecting certain parts, so I emailed the support address and got a response immediately.  After exchanging a few emails, it turned out that DruinoKit is run by a Math Teacher. He teaches during the day and fills orders as they come in. I honestly thought that this was a large company that was putting together this high quality product. This fact makes me love DruinoKit even more. I love supporting teachers that going the extra mile to help learning beyond their own classroom.

There are two kits that you could purchase. I bought the Essentials Kit and love it. 

Here is what comes in the Essentials Kit:


There is a Duino Kit Jr. that is also worth exploring.
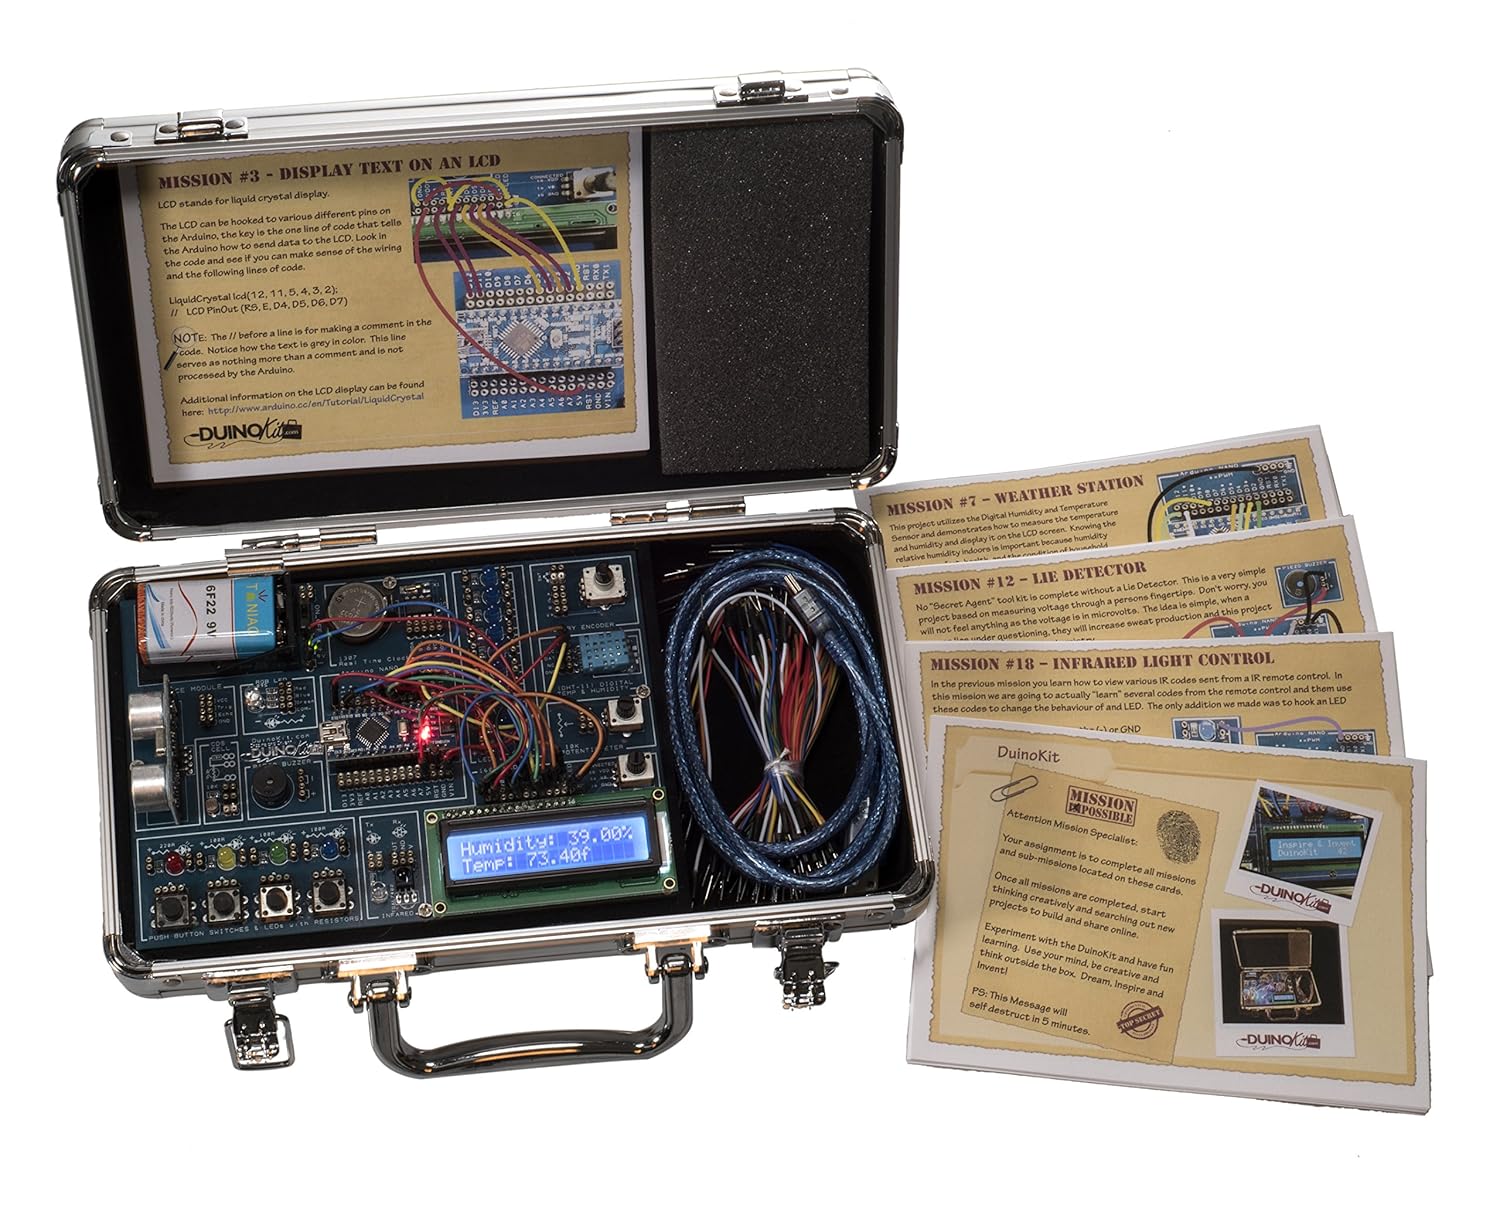
You can see that the Jr Kit comes with these really cool Mission cards. I was able to get these from the DruinoKit website to use with my Essentials Kit. You have to change some of the wire connections for the Missions to work, but I was told that there will be some new Missions coming up shortly and a revamped Forum that will allow for more sharing of the different projects people are creating.

Of all of the money I have spent over the past few months, this is some of the best money I have spent. I look forward to taking my Essentials Kit with me as I travel this Summer and talk about Makerspaces with educators.

When it is all said and done, I highly recommend educators buying a kit if they are looking for ways to enhance their own understanding of coding and Arduino and for something awesome to add to their Makerspace that supports a teachers. If you have any questions about this kit, please reach out and I'm happy to tell you how awesome it is again.

Monday, January 11, 2016

Getting Nerdy with Arduino #MakerEd #EdChat


I've already spent some time with Raspberry Pi, so I thought it was time to take the next step and see what I could do with Arduino. For those who do not know, Arduino is a general purpose microcontroller that can be easily programmed. It can connect to the Internet, move motors, turn lights on and off, detect motion, and anything else you want it to do with the correct code and add-ons. With the right amount of time, I can set up my Raspberry Pi to make the Arduino do things. The possibilities really get me excited.

The first thing I needed to do was get used to using Arduino and some simple projects. My first one was making a LED turn on. It was just plugging a few things in and running the code, but it was cool to watch it turn on because I did it. It was cool.
A video posted by Nick Provenzano (@thenerdyteacher) on

I did a few more projects over the course of the next hour that involved LEDs. I made a dimmer and programmed one to blink and different intervals. It was cool to plug the pieces in and see the code on the computer screen. I was learning how all the components line up to run power to each part. Again, it was very cool.
A video posted by Nick Provenzano (@thenerdyteacher) on
I hit a wall when it came to setting up the LED screen. I was supposed to be able to plug it all in and I could then have the screen read whatever I want. I got the screen to light up, but no words. Blurg.

I like that I hit the wall. I want the challenge. I want to know why it wasn't working. I want to spend hours looking at the diagram and seeing where I went wrong. I know that once I learn these basics, I can start to do bigger things. No joke, but I could build a robot. 

For $65, I was able to get a nice sized starter pack with 20 projects. From there, I can expand and tweak these basic projects and turn them into something bigger. The Internet will provide me with even more ideas when I'm ready.

Now, this is just one nerdy teacher having some fun on a Sunday afternoon. Imagine setting up these projects for students in your class or in the library during lunch for students interested in giving these a go. If I want to create a space where all students can explore the world of Making, I need to be familiar with some of the tools that are out there. 

You might have thought Arduino and Raspberry Pi would be cool, but you don't know where to start or are afraid to try something out of your comfort zone, but I'm here to tell you if you do not take the risk, why will a student? Put yourself out there and be the Maker you have always wanted to be.

Stay tuned for more Arduino and Raspberry Pi updates in the near future.

Hugs and High Fives,

Nick

Friday, January 8, 2016

Nerdy Pi #MakerEd #RaspberryPi

It all started with a student project and it has led me to dive into the world of Raspberry Pi. Students are working on a way to scan student IDs so they can come in and out of the classroom without disrupting the teacher to sign a pass. They chose to use a Raspberry Pi. I had never used one and had only heard about them from friends on occasion. I was blown away at the work they were doing, so I wanted to learn as well. So, I ordered a Raspberry Pi kit from CanaKit. I ordered the complete kit so I could have wifi and really see what I can do with it. I was so excited when it arrived. 


I quickly went online and started to look at the different things I could build with my new Raspberry Pi. I found a few different sites that lets you turn your Raspberry Pi into a video game emulator. The best one and the one that I ended up using is called RetroPi.

I was shocked at how easy it was to set up! It was just loading the file on the SD card and then putting the SD card into the Pi. From there, I was able to place games on the Pi. Now, it is not ethical or legal to download games, ROMS, that you do not own and place on an emulator. There are plenty of open source games our there that you could download and play on your Raspberry Pi that are worth looking at. Here is one of many different sites you can check out for all of your gaming needs. If you want to take some of your old games gathering dust in a box and place them on the Raspberry Pi, here is a great article that can show you how to do that. 

After plugging everything in, I was able to play some fun games. However, I had a Raspberry Pi exposed on the floor with wires all over. I felt like I needed to find a case for everything. This is where my (limited) 3D Design Skills come in handy. I went online and found many different case possibilities for the Pi. The one I decided to use and alter was a great design that looks like an old Nintendo. I downloaded the file and uploaded it to Tinkercad to make some edits. I called it "Raspberry Prov". Here is what I was able to come up with for my Pi. 


I found a couple of USB SNES controllers online for about $8 and set them up to use for the ROMs I downloaded. It was tons of fun. I was able to bring it over to my brother's house for Christmas and show him some games. It was fun to design the case and it was fun to download the emulator, but I was looking for a bigger challenge. I was hungry for more Raspberry Pi!

For my next project, I went to Adafruit and started to look around at some of the projects they had there. Adafruit is a great resource if you are looking for supplies to Make cool things and/or projects. I found a great project to make a portable touchscreen Raspberry Pi. I needed to get a bunch of supplies and was very nervous because I do not have experience soldering. Here is what I was able to do over the course of a couple of hours. 


I encountered some problems trying to get the correct software on the SD card and the screws I ordered were not the right size OR I did not design the case with the right size screw holes. They sort of fit, but not very well. Despite those issues, I was able to say I created a small touchscreen computer! I never thought I would be able to do this. 

The main reason I'm sharing these two nerdy adventures is because I feel strongly that we need to give our students more opportunities to do things like this. The feeling of making something from scratch, or using Scratch, to create something is an amazing feeling. I never thought I would be able to do any of this. Math and Science were subjects I always thought were out of realm of understanding. I wish I had these types of tools growing up. I would have felt more confident trying new things if I could have gotten my hands dirty and tried to build things. 

As educators, we need to look at our ever changing world and see what we can do to support our students and give them access to tools to help them in their educational journey. I see so much value and potential in using Raspberry Pi in the classroom and Makerspaces. 

I'm very excited about what the future has in store for me and for the students at my school as I work to introduce Raspberry Pi. My next adventure is going to be focusing on using Raspberry Pi and Arduino to automate something awesome. 

Until next time!

Hugs and High Fives, 

 Nick