Showing posts with label MakerEd. Show all posts

Sunday, March 1, 2026

Why Laser Engraving Belongs in the Modern Classroom and Makerspace #MakerEd

There’s a moment in every makerspace when you realize your tools have outgrown the “nice to have” phase and crossed into essential learning infrastructure.

For years, we’ve relied on 3D printers, vinyl cutters, and hand tools to help students prototype ideas and bring designs to life. But laser engraving? That’s often been seen as “too advanced,” “too expensive,” or “too risky” for schools.

After spending time with AtomStack equipment, specifically the AtomStack Atelier Laser Engraver paired with the D3 Purifier and the Rotary Chuck and Roller Tools, I can confidently say that narrative is outdated.

Laser engraving doesn’t replace creativity.
It amplifies it.

And when done safely and intentionally, it belongs in today’s classrooms and makerspaces.


Breaking Down the AtomStack D3 Purifier Bundle in Educator Terms


Educators don’t buy machines.

We buy systems that won’t break learning, overwhelm teachers, or create hidden problems six months down the line.

When new tools enter a school, they immediately collide with reality: limited time, shared spaces, varying comfort levels with technology, and very real safety expectations. The AtomStack setup stood out because it doesn’t pretend those realities don’t exist.

This isn’t just a laser engraver dropped on your desk with a "good luck" wave. The inclusion of the D3 Purifier fundamentally reframes how laser engraving fits into an instructional environment.

Here’s what matters from an educator lens:

  • A systems-based approach
    The engraver and purifier work together as a single ecosystem. That matters in schools, where piecing together third-party solutions often leads to inconsistent results or abandoned tools.

  • Designed for shared spaces
    Classrooms and makerspaces are rarely isolated. The purifier acknowledges that learning happens in close proximity and supports that reality.

  • Clear expectations for teachers and students
    When the workflow is predictable, teachers can focus on instruction instead of constant troubleshooting.

This bundle feels intentionally designed for learning spaces, not retrofitted into them after the fact.


Safety First: Why This Matters for Schools

If you’re an educator, you already know this truth:

The best tool in the world is useless if it creates stress for teachers or administrators.

Safety isn’t just about compliance, it’s about confidence.

The AtomStack system supports that confidence through:

  • Effective fume filtration that keeps learning spaces usable

  • Clear safety expectations that can be taught and reinforced with students

  • Reduced “unknowns” that often make schools hesitant to adopt new tools

  • USB key that prevents the unit from running without it.

This matters because when safety is built in, educators stop asking “Should we?” and start asking “What can students create next?”


Classroom and Makerspace Use Cases

Laser engraving isn’t a novelty tool, it’s a bridge between digital thinking and physical creation. What makes it powerful in classrooms and makerspaces is not the machine itself, but how naturally it supports deep, transferable learning experiences.


Below are more detailed examples of how laser engraving fits authentically across content areas and instructional models.

Design Thinking & Project-Based Learning (PBL)

Laser engraving reinforces the full design cycle rather than shortcutting it.

  • Empathy & problem definition
    Students begin by identifying a real need: wayfinding signage for a school event, accessibility labels for a makerspace, or commemorative items tied to a community project.

  • Ideation & prototyping
    Students sketch, digitally design, test engravings on scrap materials, and refine before committing to final pieces. The permanence of engraving encourages thoughtful iteration rather than rushed submissions.

  • Reflection & revision
    Finished artifacts provide concrete evidence for critique sessions, peer feedback, and design journals.

Humanities & Visual Storytelling

Laser engraving allows students to treat text and imagery as physical artifacts, not just digital files.

  • ELA
    Students engrave symbolic imagery, literary quotes, or original typography tied to novels, poetry units, or personal narratives. Projects can culminate in gallery-style exhibitions instead of traditional essays.

  • Social Studies
    Learners recreate historical artifacts, engraved maps, timelines, or interpretive plaques that contextualize events and movements. This reinforces historical thinking while emphasizing accuracy and sourcing.

STEM, Engineering, and CTE Applications

In STEM-focused environments, laser engraving becomes a precision tool rather than a decorative one.

  • Engineering design
    Students create labeled prototypes, measurement guides, spacers, or components that integrate into larger builds.

  • CAD to fabrication workflows
    Learners experience the full pipeline from digital modeling to physical output, reinforcing spatial reasoning and tolerances.


  • CTE & workforce alignment
    Students practice industry-relevant skills such as calibration, material testing, and documentation.

Student Agency & Ownership

One of the most consistent outcomes of laser-based projects is increased student investment.

  • Personalized engravings, names, logos, or original designs, signal that the work matters.

  • Students are more willing to revise and improve when the final product feels permanent and public.

  • Projects shift from disposable assignments to portfolio-ready artifacts.


Authentic Assessment & Exhibition

Laser-engraved work supports assessment models that move beyond rubrics alone.

  • Process documentation: design files, test engravings, and reflection logs

  • Public display: signage, artifacts, or functional items used by the school community

  • Performance-based assessment: evaluating design decisions, precision, and problem-solving

These use cases show why laser engraving belongs in learning spaces, not as a special occasion tool, but as a regular part of creative, interdisciplinary instruction.


Classroom and Makerspace Use Cases

Laser engraving isn’t a novelty tool, it’s a bridge between digital thinking and physical creation. That bridge matters because it connects skills students often learn in isolation.

Students design on screens all the time. What they rarely get to do is see those designs become permanent, tactile artifacts that require precision, planning, and iteration.

Here are some high-impact ways laser engraving fits naturally into learning environments:

  • Design thinking & project-based learning
    Students move through empathy, ideation, prototyping, and refinement in a tangible way. The permanence of laser engraving encourages thoughtful design decisions rather than rushed work.

  • Cross-curricular integration

    • ELA: Symbolic imagery, book covers, literary quotes, visual storytelling

    • Social Studies: Historical replicas, timelines, geographic features, interpretive signage

    • STEM & CTE: Engineering components, measurement tools, labeled prototypes, CAD-to-product workflows

  • Student agency and ownership
    Personalization changes how students see their work. When their name, design, or idea is permanently etched, the project matters more.

  • Authentic assessment opportunities
    Finished products provide natural entry points for reflection, critique, and revision discussions.

This is the kind of tool that raises expectations without increasing pressure, students rise to the challenge when the work feels real.


Why the Purifier Is a Big Deal for Educators

Let’s be honest:
Most makerspace tools fail not because they don’t work, but because they interrupt the flow of learning.

The D3 Purifier solves a very real problem:

  • No scrambling to open windows

  • No last-minute room changes

  • No anxiety about lingering smells or particles

It allows laser engraving to live where learning actually happens, not in a separate room that students visit once a semester.

That’s not a small thing. That’s the difference between a tool being used and a tool being avoided.


Rotary Add-on Ups the Creativity

Rotary devices significantly expand how laser engraving can be used in classrooms and makerspaces by allowing students to work with cylindrical and curved objects instead of only flat materials. 

This shift adds meaningful design constraints, requiring learners to think about alignment, curvature, balance, and precision before committing to a final engraving. 

Projects such as tumblers, tubes, model components, or round containers feel immediately authentic and help students connect digital design skills to real-world fabrication practices. 

By introducing rotary tools, laser engraving moves beyond surface decoration and becomes an applied design experience that reinforces iteration, spatial reasoning, and careful planning, skills that translate directly to engineering, CTE pathways, and professional maker workflows.

Friday, February 23, 2024

Motion Comics with @AdobeExpress #AdobeEduCreative #MakerEd

I wanted to share a clip of a video I assembled based on the motion comics my students created. Students used Adobe Express to create all of the images and pages of their comic. We took pictures using a green screen and the students used Express to remove the background and animate them based on their storyboard design they created. Here is an image of one of the pages.

The first graders were able to name their superhero and keep the mask and cape. This was such a fun process and showcased what can be possible using Adobe Express and looking for creative, engaging solutions to traditional curriculum items. In this case, plotting and pacing a story for a younger audience. You can follow more of these types of projects on Instagram, Twitter (X), and TikTok. 


@thenerdyteacher Students in my Innovation and Digital Design Class partnered with 1st grade buddies and used @adobeexpress to turn them into superheroes! Combining green screens with animation features once the background was easily removed, students were able to bring their storyboards to life. Check out my website for more info. #FYP #TeacherFYP #adobe #Education #MakerEd #teachersoftiktok #TeacherTok ♬ Marvel Studios Fanfare - Geek Music

Monday, January 8, 2024

Bringing Poetry to Life! #MakerEd #AdobeEduCreative

One of the things that I have been excited about is the fact that you can bring so many things to life using Adobe Express. My design students have been having a blast using Animate from Audio and the Animation feature on images to make them fade in, zoom out, bounce around, spin, etc. The options to create movement has really engaged those students who are not as excited with static image creation. 

Another teacher in the middle school started a literary journal elective class this trimester and students will be in charge of putting together the submissions from the student body. I thought it would be a nice project for students to create visual representations of poems they love and submit it to The Shield. Here is a brief overview of the lesson. 

1. Students will select 4 poems that are short enough to fit into the poster space available. 

2. Students will create four posters. Two posters will be static images and two posters will be animated in some way. Audio can be added as well. 

3. Students will submit all four posters to Seesaw. 

4. Students will choose one of their static posters to be submitted to The Shield. 

I thought this would be a nice assignment for students who wanted to express some creativity, but are not quite ready to showcase their own poetry. Here are two examples I created for the students. 


For the video, I needed to use audio from Pixabay for the rain and birds and then I had to combine them in Garageband because Express does not let you stack audio or it does, but I couldn't figure it out. If you know how, let me know in the comments! This was a fun project for me and I know the students will love it when they dive in. If you have any thoughts or comments, leave them below!

Hugs and High Fives, 

The Nerdy Teacher


Thursday, October 12, 2023

Draw and Translate on @AdobeExpress! #AdobeEduCreative @RebeccaLouHare

I wanted to share this quickly before I head out for the weekend. Adobe Express has introduced a DRAWING feature! Teachers and students have been asking for this for a very long time. The possibilities are endless and I can't wait to see what students and teachers create using tablets/touchscreens to draw. Adding drawing simply increases the creative abilities of students and teachers. It is very straightforward to use and will provide lots of different ideas. Here are a few quick screenshots I tool 


You can find the Drawing option under the Education and Suggested tap on the new.express.adobe.com homepage. You have the option to create from Scratch or use a template. Here is what I was able to whip up quickly. 


Look out Picasso! You can change colors, styles of brush, thickness of the lines, etc. This is exactly what I was hoping it was going to be and could not be happier. They also have decorative brushes! Look at the bats I created. You increase the size on the left and you can have all types of fun creations with the simple swipe across the page with the mouse. 


I am super excited about this new feature and I hope everyone that loves Adobe Express takes a moment to try it out and share their thoughts. 

Quick addition because I just saw this as I was about to post. You can translate into different languages. Entire documents! What?! Check this out!

These are a couple of amazing features that are going to increase the creativity across the board for even more students and teachers. Check it out and share with your teacher friends!

Hugs and High Fives, 

NP 

Thursday, August 24, 2023

The Engineering Design Process #MakerEd @AdobeforEducation #AdobeEduCreative

Hello friends! I wanted to share this example I made using Adobe Express that used Animate from Audio. It is super simple to use! You choose a character, choose a background, and record your audio. Adobe Express does the rest! I wanted to create a short video that explains the Engineering Design Process for my students in design class and this is what I was able to create. My favorite part is the last few seconds where I was able to use Adobe Express to have video running on different layers at the same time. It was just a fun think I wanted to see if I could do and I could! Check out it out below or click this link!


Hugs and High Fives, 

N Provenzano

Monday, April 17, 2023

Getting Started with Adobe Express: A Beginner's Guide to Creating Stunning Visuals #AdobeEduCreative

Today, we're excited to introduce you to Adobe Express, a powerful yet user-friendly tool for creating eye-catching visuals, perfect for social media, websites, or presentations. With an easy-to-use interface and an extensive range of features, Adobe Express is perfect for both beginners and experts alike. In this post, we'll walk you through one of its most popular features - creating custom graphics. Let's dive in!

Step 1: Open Adobe Express and Select a Template

To get started, head over to the Adobe Express website (https://www.adobe.com/express/) and sign up for a free account. Once you're logged in, you'll find a wide array of templates to choose from. These templates are organized by theme and purpose, making it easy to find the perfect starting point for your design. Select a template that best fits your needs and click on it to open the editor.

Step 2: Customize the Text

One of the first things you'll notice in the editor is the pre-existing text, which you can easily customize to suit your needs. Simply click on the text box and start typing your own content. To change the font, size, color, or alignment, use the options provided in the toolbar above the text box. Feel free to experiment with different styles until you achieve the desired look.

Step 3: Add Images and Icons

To make your design truly unique, you can add images and icons from Adobe Express's extensive library. Click on the "Add" button in the left-hand toolbar and select "Photo" or "Icon" to search for the perfect addition to your design. Once you've found the right image or icon, click on it to add it to your graphic. You can then resize, rotate, or reposition it as needed.

Step 4: Customize the Background

Adobe Express allows you to customize the background of your design with colors, gradients, or even images. Click on the "Background" option in the left-hand toolbar and choose between "Color," "Gradient," or "Photo." You can select a color from the palette, create a custom gradient, or search for a background image that suits your design.

Step 5: Save and Share Your Creation

Once you're satisfied with your design, it's time to save and share it. Click the "Share" button in the upper-right corner of the screen and select the desired file format (JPG, PNG, or PDF). You can also choose to share your design directly to your favorite social media platforms or via a unique link.


And that's it! With just a few clicks, you've created a stunning custom graphic using Adobe Express. Whether you're designing social media posts, website banners, or presentation slides, this powerful tool makes it easy to create professional-looking visuals that leave a lasting impression. So, go ahead and unleash your creativity with Adobe Express!


Monday, March 6, 2023

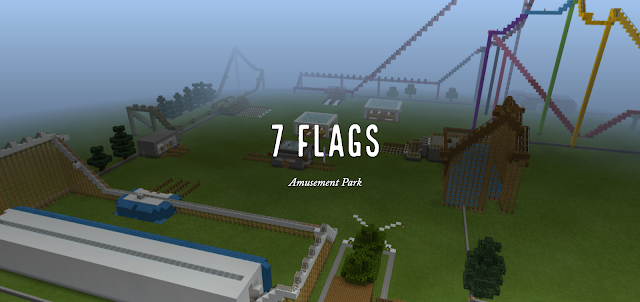
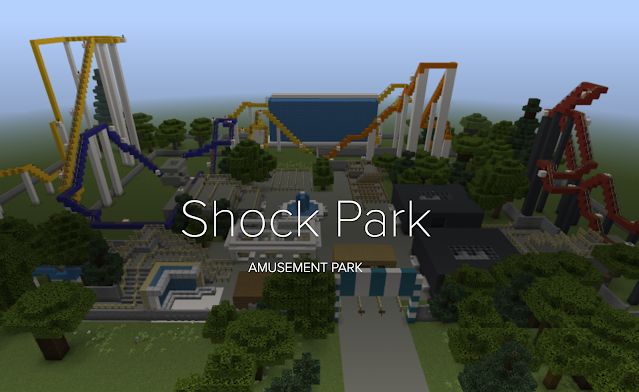
Using Minecraft to Design Amusement Parks @PlayCraftLearn #MakerEd

My Innovation and Design class has been a work in progress since I created it in 2020. Lots of ups and downs as I tried to figure out the balance of all of the different types of projects I wanted students to explore over the course of the trimester. I feel like I finally landed on something that is working and I wanted to share it here. 

I wanted students to think big for their Minecraft project but felt like I never had the time to give them because of the other projects. I also noticed that there are some projects that require waiting and do not take the entire class period. For example, making the cutting boards requires wait times as boards are cut and glued together. I don't want students just sitting and waiting for projects to glue, so I realized that a long-term Minecraft project might be the thing I have been looking for to solve my time problem. In retrospect, it is a pretty simple solution to the problems I was having, but, sometimes, things just take longer to click. 

I introduce the Minecraft assignment to students at the start of the trimester and let them know it will be due at the end of the trimester. Students will be given days during the class to work on it, but they will also have time in other classes when they are waiting for projects to print on the 3D printer, be cut on the laser cutter, or finish glueing. These times will keep them active in the design and build process while waiting for other projects to finish. I rolled this out for the past trimester and I think it worked very well. Students worked here and there on their build and created some amazing projects. I think I would give more in class time on the assignment as some students felt rushed at the end, but that might also be just Middle School time management issues. The start of the third trimester will give me a chance to tweak anything as I have another go at the approach. Below you will find the activity I assign on Seesaw and a few of the completed projects you can click on and will be taken to their sites. Some students used Adobe Express to create a website and others used Google Sites. 


The Google Sites created below can only be accessed by students and staff from our school. 


The students were excited to showcase their work and there were great conversations about what goes into a website that is trying to sell people on what they have to offer. Spelling and grammar conversations were had as students talked about what a website that is filled with errors might say about a business. Most of all, time management was a big part of the conversation since many students planned for something much bigger, but underestimated the time it would take to complete much of their park. My class is about failure as much as it about design and creation. Learning those hard lessons on time management and completing tasks in a timely manner are tough lessons to teach, but learning them in an environment where they do not have to be afraid of failing their assignment or class because they tried something big is important to me. (My class does not have homework or grades to push student to try big ideas and see how they work.)

Like many other teachers, I know that my class is a constant work in progress, but I wanted to share this win because sharing good things once in a while is good for a teacher's soul. 

Hugs and High Fives, 

Nick

Thursday, February 2, 2023

Student Podcasting with @Soundtrap #MakerEd #PBL #ELA

6th grade students had the opportunity to create their own short podcast episode to share their thoughts on a book they think other should read. These book talks are around 2 minutes long and allowed students to create some intro music using Soundtrap tools. You can find the Podcast, Stevens 6th Grade Ideas, on Spotify. 

The students set up their Soundtrap account, chose a book they liked from this year and had to record two versions of their Book Talk. The first version was an off the cuff take. They just needed to talk about the book and cover a few common points. The second version required the students to create a script to guide their Book Talk. Once they had both recorded, they were able to choose which one sounded better to them. From there, they created some intro and outro music and let their teacher know they were done. Stevens listened to the podcast episodes and uploaded each one to Anchor which pushes the podcast to Spotify. The lesson took three 70 minute blocks to complete. The first block was a short assignment with Soundtrap that had students create a ringtone so they could get used to the program before embarking on their podcasting adventure. 

Here are a few of the book talks you can listen to from my page, but I encourage you to head over to Spotify and listen to many of them and share them with your students if they are looking for new books to read. 


Thanks for listening and sharing. The students are very excited to share their thoughts with the world. 

Hugs and High Fives, 

Nick

Wednesday, December 14, 2022

A Cutting Board Education #EdChat #MakerEd

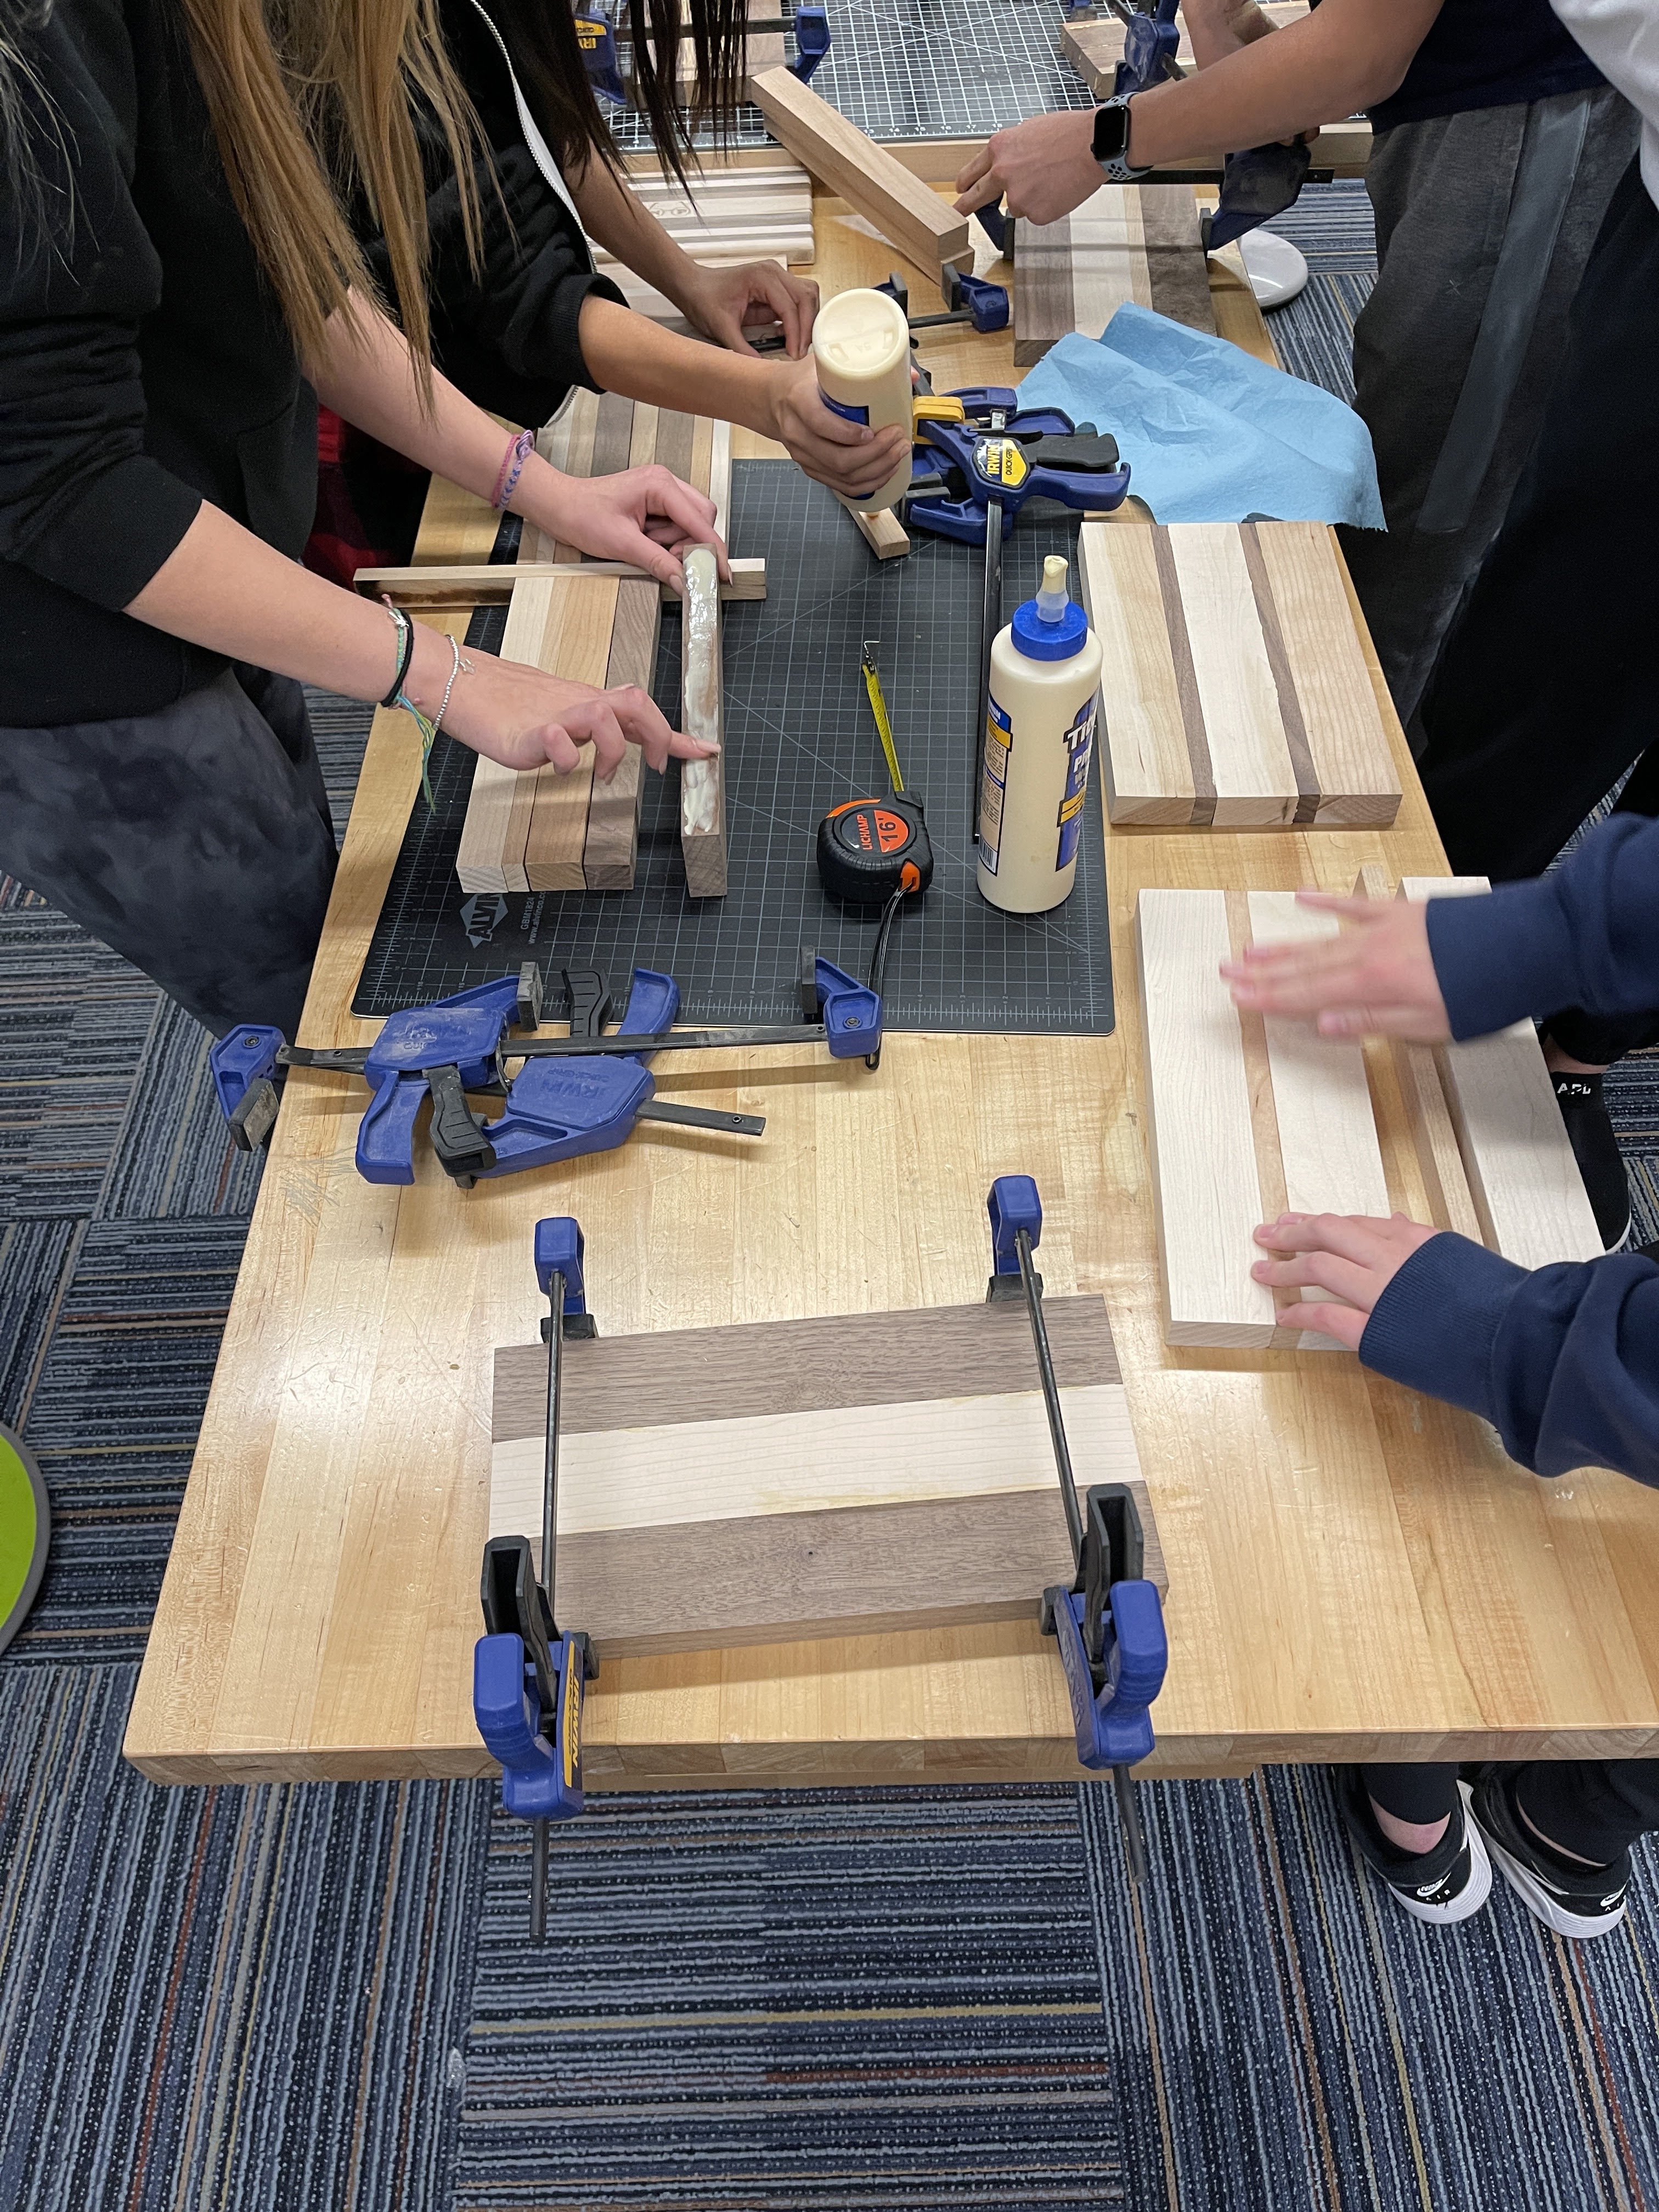
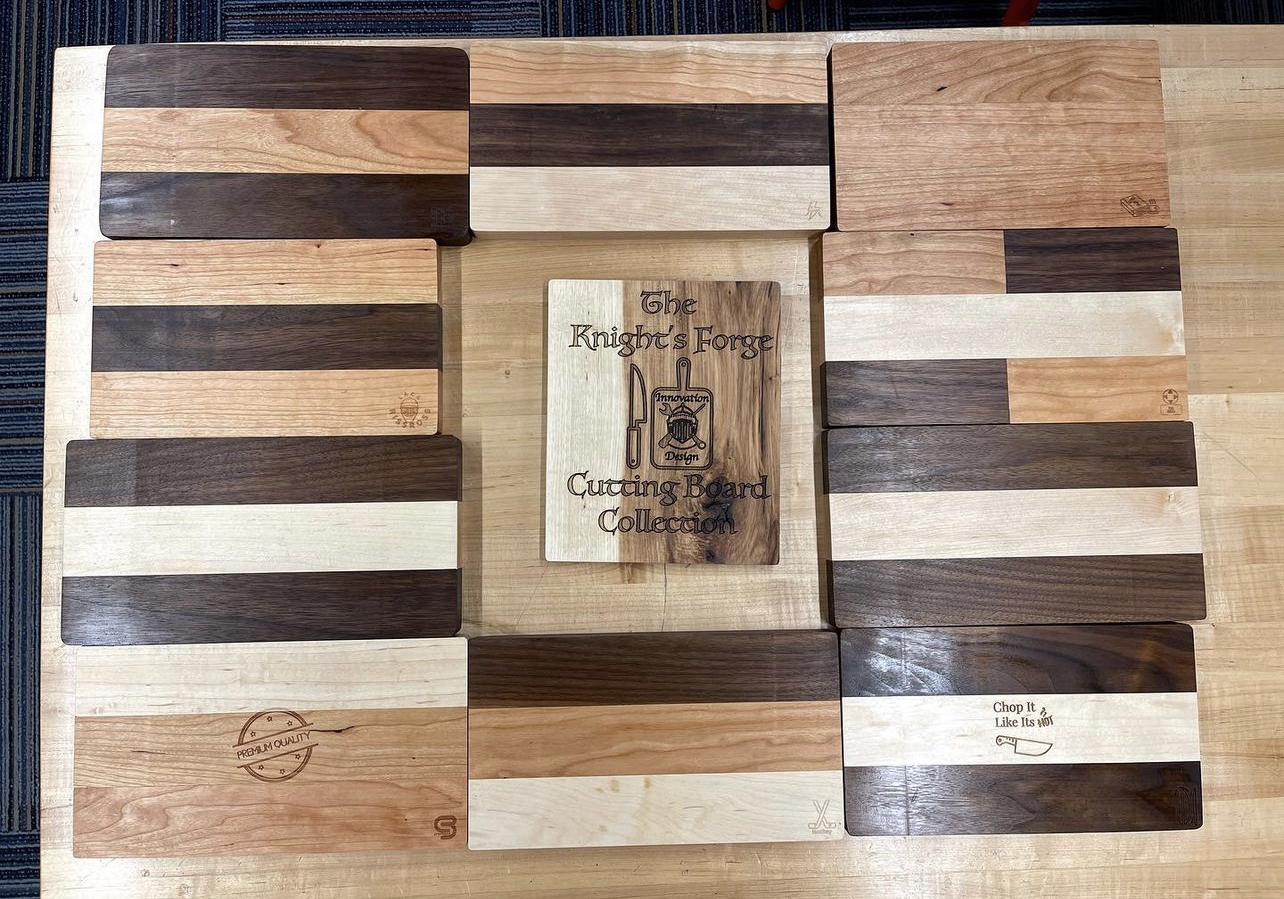
One of the goals for my Level 2 Design class for the 7th and 8th graders was to get them building with their hands. I wanted students to design, measure, cut, and build. One of the easiest ways to do this is through making cutting boards. When it comes to woodworking projects, this is a great beginner project that has kids leave with something they have created and can give away as a gift. Here are some of the highlights of the process. 

Students select their pieces, glue them together, and clamp them in place. What is nice here is that I have a variety of sizes of the wood strips so students can choose a design that works for them. The catch is that the overall board cannot be over 6.5 inches in width. Any wider, and the clamps will not fit. These middle schools will need to work on their measuring and addition skills to make sure the design they want fits in the size constraints. 

Once all of the boards have dried, a couple of students volunteered to help trim the boards. It is another math problem for the students to figure out how much do they need to trim without shrinking the board beyond 11 inches in length. Students then sand the board for a bit with 120 grit sanding block to get rid of any rough edges. 

Next, students will use cutting board oil to seal the boards and make them food safe for use. Students need to measure the correct amount to use for the board. Once the boards are oiled, the students wait for it to dry and can take it home the next day. 

For this projects, students are using a mitre saw, planer, glue, and some boards I ordered from Amazon. People ask me what do students learn in a Maker focused class and there are different answers for different projects. When it comes to cutting boards, students are using those math skills they have learned over the years and are also learning some basic principles of design and building. 

This is a project that I think would be an amazing addition to a math class exploring geometry. It would take some prep on the teacher's part, but it could be a fun project that gets kids thinking about shapes in a different fashion. 

This is not for everyone, but I though I would share for those looking for something different. 


Hugs and High Fives, 

N Provenzano


Monday, September 12, 2022

Cutting Board Challenge #MakerEd #AdobeEduCreative

We are starting the school year with some fun challenges in our Innovation and Design Level 2 class. I really want to focus on physical making with digital making as a support and design tool. Our first project will be using Adobe Creative Cloud Express to create their own logo. From there, we will use the laser cutter to put their logo on a keychain. Here is my example I will be using with the students,


From here, students will be design their own themed cutting board. I was able to get a bulk order of 5"x8" bamboo cutting boards for the class from Amazon. Students will design a PNG in ACCE and we will use the laser cutter to etch the design. Their logo will go on the back. Once they have created their cutting board, they will need to create an ad for it. Here is my example,


One of the things I trying to do this year is not make my examples over the top. I spent lots of time on other examples in the past and I had students say they would not be able to match my example. I think that impacted their effort. For first time project examples, I'm going to scale back the examples until I can use student examples. 

All of these examples and projects will live in their portfolio on Seesaw. By the end of the trimester, I hope to have each student with a collection of their design work. 

Feel free to share some thoughts and ideas on how I could tweak this to make it better. I appreciate all of the feedback. 

Hugs and High Fives, 

N Provenzano

Monday, May 9, 2022

Podcast Design Project #MakerEd #AdobeEduCreative

Hey folks! I wanted to share a fun project that I have assigned my students that uses Adobe Creative Cloud Express and Seesaw. Students will use ACCE to create an ad for a fake podcast they will create. Below are the directions for the assignment. 


For this activity, you can partner up if you'd like to create an ad and a sample of what your podcast would be about. Follow the steps below to complete the activity. Step 1: Decide whether or not you want a partner for this activity. Step 2: Brainstorm possible idea for a podcast topic that you think people would find interesting. Step 3: Come up with a script for a short clip of this podcast. It should be around 3-4 minutes in length. Step 4: Design an ad to promote the podcast using images that connect to your script. Step 5: Create the ad in Adobe Creative Cloud Express. (express.adobe.com) Step 6: Post the ad to Seesaw and record the podcast clip on the same page. Step 7. Post the script you wrote for the clip. Podcast Ad Requirement: Name of the podcast. Images that connect to the topic of the podcast. Names of the people hosting the podcast.

Here is a link to the assignment that has my example.


The students dove in and I can't wait to share the work they have created for the podcast assignment. 

Hugs and High Fives, 

Nick


Thursday, April 21, 2022

Coloring and #MentalHealth #EdChat #SelfCare

As we wind down the school year, the stress levels for students tend to shoot up through the roof. One of the things that I have found to be wonderfully helpful in mitigating that stress is something so simple and something that all kids love to do, coloring. 

That's right, coloring is great for mental health. Don't believe me, check out this article from the Mayo Clinic and this article from the Cleveland Clinic on why coloring is good for children AND adults. I offered coloring to my students the other day and almost every single one took me up on the offer and they sat, talked, and colored. It was such a nice and calming moment in class. 

If you are looking for some coloring resources, you can check out the ones below. 

Supercoloring

Coloringhome (Warning: Some pages are NSFW, but they have lots of kid options.)

From ColoringHome.com


For the mental well-being of your students and yourself, take a break and color something beautiful. You will feel so much better if you do. 


Hugs and High Fives, 

N Provenzano

Wednesday, April 13, 2022

Coolest Projects from Raspberry Pi #MakerEd

If you are looking for a fun way to bring a design challenge to your students, please take a moment to check out Coolest Projects from Raspberry Pi.


Coolest Projects provides all of the information a student and a teacher needs to be successful. The mentor guide really helps the teacher through the process. I love the student guide that was created that helps walk the students through the design process. From ideation, creation, testing, and reflection, the student goes through the entire process following the guided steps. 

Whether creating something using Scratch or something that requires physical hardware, there are plenty of different categories that students can submit their project to for consideration. I will be rolling this out to my 6th grades in the next week and I can't wait to see what they come up with for Coolest Projects. 

The deadline for sharing the projects for judging is May 11th. I am looking forward to seeing all of the amazing projects this year. 

Hugs and High Fives, 

N Provenzano

Thursday, March 24, 2022

Connections #EdChat

It has been a couple of weeks of first for me this month. I went to my first in person conference in two years. For the first time in a couple of years I got on a plane to visit a school to support their work with PBL and MakerEd. It has been a very weird experience. As I reflect on what stands out most to me about these experiences it is pretty simple, Connections. 

I was excited to see so many friends at MACUL last week. These are people I hold dear to my heart and we have not been able to connect in person for so long. Sessions were great, but the connections with my friends are what really stood out. Connecting virtually is nice when you have to, but connecting face to face, that is something that is so very special. It didn't take very long for a group of us to be sitting around a table sharing the new tools we are using or the lessons we are trying out for the first time. We are friends, but we are educators always looking to share and learn as well. Those connections were so invigorating for me. I left the conference full of energy and new ideas that I was excited to share with as many people as possible. 

I am in Jacksonville, FL this week working with Assumption Catholic School on their move to a PBL focused pedagogy with an infusion of MakerEd. I've been working with them this school year virtually and this is the first time I've been able to come to the school and check things out. I have been able to visit classrooms and see teachers in action. I held an after school session for staff and talked about PBL and what it can look like for teachers and for the students. I was able to hear their stories and be inspired by the work that they are doing every day. Again, at the end of the day, it was all about the connections. Talking to these great educators has been nice and it has helped them get started on their great work, but connecting in person is boost for everyone. Deep down, we all want to connect in some way. Seeing the students have so much learning about headline writing in social studies or exploring poetry in ELA makes me so happy because the kids were so excited. 

I loved be able to present in person and see the reaction of the staff as I told stories. As a presenter, I have missed being able to "read the room" to see if I should spend more time on a topic or move a long. That connection that happens in the room if you are doing it right is so amazing and I didn't realize how much I missed it until I did for the first time after a two year break. 

There are many great benefits to learning virtually and connecting online for PD, but nothing can ever replace the value of connecting face to face with friends and friends you haven't met yet to support your learning. I look forward to a busy Summer presenting in person across the country. Please take a moment and stop and say hi if I come to your event or you see me at ISTE. I'd love to connect and learn with you. 


If you are looking for PD and support as your school explores PBL and/or MakerEd, reach out to me and we can see how we can connect to make that happen. 


Hugs and High Fives, 

Nick

Thursday, March 17, 2022

#MakerEd and Wellness #MACUL22 #SEL

One of the things that people ask me about MakerEd is how does it support student wellness. Social Emotional Learning is becoming a very hot topic in education. For those of us who have been around for a while, we have always known the value of making sure students' Social Emotional needs are being met because they cannot learn unless they are. MakerEd is one of many different ways to engage students in learning and also support SEL. 

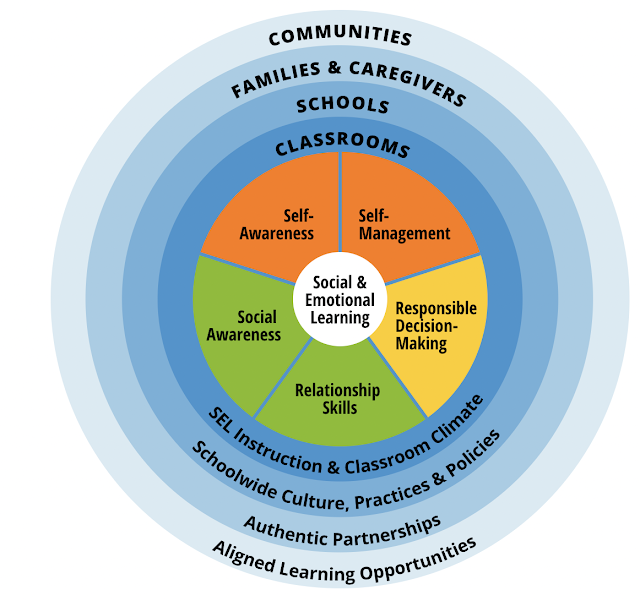
From CASEL.ORG

When we look at the framework of SEL created by CASEL, we can see that there are elements that link directly to what good MakerEd lessons and projects incorporate. Let's take a look at Responsible Decision-Making and Self-Management. 

When students are working on MakerEd projects, I emphasize the value of making good decisions about how they are going to structure their work time and how they are going to plan their project to make it possible to complete in the time allotted. Learning how to manage time for projects and how to make those decisions on their own are important skills for students to work on in school. Understanding that they will make mistakes, it is important to give them the space to make them and then coach them to learn from them and be better for the next time. 

Group projects can be messy, but it is important to work on relationship skills in class. It is important to have students work with a wide variety of peers to help them understand where everyone in a group is coming from so they can grow as learners and people. Not every project should be a group project, but there should be opportunities for students to come together and work on a project that allows multiple ideas to come together to find a solution. 

Projects can allow for students to think about the world they live in and how they fit in it. They can explore problems and consider the ways that they can help solve them on their own or with the support of others. SEL is not something that can be simply thrown into lessons and expected to make the mental health of all students better. It takes time and serious considerations to make sure that SEL is included in planning in a thoughtful manner. I've yet to find a worksheet that supported student SEL as effectively as a well crafted project. 


Tuesday, March 1, 2022

Reflection as Assessment #MakerEd #EdChat

One of the things that I am often asked is how I assess MakerEd work from students. The traditional education system is still grade focused. Students are taught from a very young age to chase the grade because that is what matters in the end. 

Getting students to understand that there is more to school than grades requires serious retraining on the teacher's part. It is not impossible, but it is not easy. One of the ways I have helped my students explore learning and MakerEd in my Mechanical Engineering class is the emphasis we place on reflection.

Each unit is a challenge that students need to complete. They can design their own solutions based on their research and there are goals they are trying to reach, but they are not assessed, or graded, on if they reach those goals. Their assessment is how they reflect on their work in the challenge. Here is one example, 

Students are tasked with building a bride using glue and no more than 200 craft sticks. Their bridge needs to be able to support at least 100 pounds. They will do the research and design a bridge they think will best accomplish this goal. When the bridges are done, we take the total sticks used and subtract that number from the total weight it held. The group with the highest number at the end won the challenge. 

When they have completed the testing and reviewed all of their work and the work of other groups, they are given a reflection sheet. The reflection asks students to explore why they were or were not successful. Their ability to be critical of the work, or lack there of, they put in is important. The first reflections are often the toughest for students because they are hesitant to be critical of their own work thinking it will lead to bad grades. In reality, the students that dive deeper and are critical of their decisions get the most out of class.

My job during the project time is to be engaged with the students, advise them on their choices as they work, provide feedback on their process, and support their overall needs while working. After the reflection is submitted, my job is to provide my thoughts on their thoughts. It starts a conversation about their learning process. As we move through the semester, I have found that some students are too hard on themselves and sometimes do not recognize the successes they had in the project. Students are still very new to the reflection process so I need to support them as they learn to highlight the wins and understand the loses. 

At the end of the day, I have to place a grade in the grade book. The students earn their grade through reflection and dialogue. These reflections are saved and explored at the end of the semester where they are asked to show the growth points in the class. If we truly want growth for our students, you can't have it without reflection. It is a shame that reflections tends to be the first things skipped when we run out time. 

How do you use reflection in your classes?

Thursday, February 17, 2022

Breaking A Few Eggs #MakerEd

One of the things that I have always loved about MakerEd is the mistakes that are made along the way. Mistakes are an important part of the learning process, but grades have made them feel way worse than they should be. The best metaphor for this is the egg drop project my 6th graders work on for Innovation and Design. 

Students are given a bag of supplies and are tasked with making a vehicle that can protect an egg from a one story drop from a balcony. Students work to design and build their vehicle and are even given some plastic eggs to use a test dummies for practice drops. However, when it comes time to drop the real egg, some students are scared. They do not want to see a broken egg. Even though they will not receive a bad grade for a broken egg (my class does not have grades) and they will be given a chance to redesign and drop a second egg, some of those students are hesitant to drop because of what failure will physically look like; a destroyed egg. 

Some students love the idea of dropping an egg and seeing a very real success or failure. The binary way of looking at it works for some students. If it broke, they need to figure out how to fix the mistake so the next egg doesn't break. If it is unbroken, they are reassured that their design worked. While not every assignment or project is as clear as this, it is a nice way of looking at work students do in school. 

If the egg breaks, just have another go at it and try to get it right. That approach works for every assignment. I ask students to not be afraid of a broken egg. Just go for it as long as they commit themselves to finding out why the egg broke and work to make sure the same mistakes do not happen again. With that approach, a few broken eggs will be expected and students will not be so hesitant to try. 

Mistakes are how we learn and we want students to be more comfortable with them. Sometimes is takes a few broken eggs for them to see this. 

Wednesday, December 8, 2021

Sharing @FlexFarms Hydroponics In The Classroom with @Adobe Premiere Rush #EdChat #SciChat

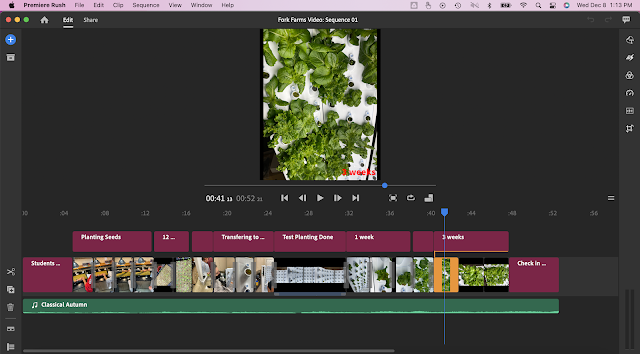
After three weeks of working with the Flex Farm from Fork Farms, I was able to put together this video using Premiere Rush from Adobe. I was able to take the photos from the past three weeks and add them to the application. I was quickly able to add transitions, title slides, and music. The music options were amazing. I could type into the search bar and there were so many different options for music. I discovered that they have tons of sound effects as well. I was flooded with ideas after hearing some of them. I could create some very fun videos in the future now that I have access to this amazing library of sounds. 

When I was done, I exported as an Instagram video and it formatted everything for me in an instant. The file was saved on my computer and the files are in the cloud. 

I think there are so many parts of Adobe that people do not explore because the assumption is that they are too difficult to learn to do something simple. There is still plenty for me to learn using Premiere Rush, I was able to create something that was able to share what we have been doing in our school with the Flex Farm. 


Here is a quick look at the workspace of Adobe Premiere Rush. I love a simple and clean UI. Too many tools always overwhelm me and PR does not do that to me. I wish I would have tried using it sooner. 


Here is the finished video showcasing the growth over the course of three weeks using the Flex Farms. 

If you have any questions about using Adobe Premiere Rush or how the Flex Farm could work in your learning environment, please feel free to reach out to me. 

Hugs and High Fives, 

NP

Friday, December 3, 2021

Visualizing Growth with @Seesaw and @AdobeSpark #PBL #AdobeEduCreative

One of the things that I have advocated for when talking to people about Project Based Learning is the need to reconsider how we assess growth. As an ELA teacher, one of the most common practices was the manila folder where students would keep their assessed writing. The idea was that they could go back and see how they have grown from one essay to the next. Another traditional format is asking students to keep a binder of everything they have done in class and hope their water bottle doesn't explode in their bag or lose it completely. 

Those are traditional examples of portfolios that many of us have used for years, but maybe never actually called a portfolio. As I shifted more to project based learning and created my design classes for 6th-8th grade, I needed a way to assess student work that also allowed them to hold on to it and see their own growth over time. Adobe Spark and Seesaw have been two apps that have really helped me accomplish both of those objectives. 

As a school, we use Seesaw as out main portfolio tool in the Middle School. I like it so much, that I also use it with my high school Mechanical Engineering class. It allows for teachers to create classes, create activities in those classes, and it allows for students to post their work to those activities to demonstrate their understanding of the material covered in the activity. What is really nice about Seesaw is that is allows for video uploads, image uploads, and recorded annotation. Students can spend multiple classes creating a project and then upload images of their work to the Seesaw with a provided narration that explains what they did and how that demonstrates their understanding. I have found that by adding Adobe Spark to the mix, you can take the portfolio to the next level. 

Adobe Spark is free to all students and allows for the creation of images, slideshows, and websites. All of it is hosted and stored on their account. They can download their content and use it as needed. What I love about Adobe Spark is that it gives students access to amazing creation tools that have normally been reserved for art departments or design departments. I have students that love to use Adobe Spark to create different templates and styles to showcase their work and then they upload it to Seesaw. Some have used websites to store all of their work as they progress through the trimester and share the link on Seesaw. Adobe Spark adds an element of versatility to the use of portfolios in the classroom. 

Due to privacy issues, I cannot share any of the work that students have created with all of you, but here is some of the work I have done using Adobe Spark to give you a sense of what it looks like. This is template I created in Adobe Spark that students could use if they wanted to showcase their work at the end of the marking period. You can make your own copy of this template by following this link to my library of templates. 


What I think is most important is helping students understand the value of looking at growth over time. Where have they started and where are they now. It is so important to remind students that everyone is on their own learning journey and are at different points than their peers. Having a portfolio that allows students to truly see their growth is a wonderful way to keep the hopes up for those students who might feel like they are not where they should be in class. Using Seesaw and Adobe Spark has really allowed for some great conversations with students about growth. I will continue to be an advocate for project based learning in the classroom because I have seen how it impacts student learning. Seesaw and Adobe Spark are just more resources that showcase how important PBL can be. 

If you have any questions about Seesaw, Adobe Spark, or Project Based Learning, please reach out on my social channels. 

Hugs and High Fives, 

NP

I am an ACE Rewards Program member with Adobe.

Tuesday, October 26, 2021

The Ed of #MakerEd

When MakerEd is talked about, there is a heavy focus on the Maker part and not so much on the Ed part. I know I am guilty of this. I think it has lots to do with the fact that the Maker part is something that is easy to share. I can showcase the thing I built or the projects the students have built, while the education part often goes unseen. As I've been thinking about MakerEd and how important it is for schools to explore and integrate the ideas into their learning culture, I wanted to make sure that I share the education side of MakerEd in the hopes to convince more people of the value of this approach in the classroom. Part of that is looking at the research and I found a great website that has links to a variety of educational studies that explore the impact on MakerEd in the classroom. 

Makers Empire is a company that makes a 3D design software that supports digital making. Through their website, I found a page dedicated to MakerEd research. Check out the Research page here. There are lots of great articles and links here, but I wanted to share some that stood out to me. 

Here is a wonderful article on The Maker Movement in Education. It was published in the Harvard Educational Review and here is a synopsis,

"In this essay, Erica Halverson and Kimberly Sheridan provide the context for research on the maker movement as they consider the emerging role of making in education. The authors describe the theoretical roots of the movement and draw connections to related research on formal and informal education. They present points of tension between making and formal education practices as they come into contact with one another, exploring whether the newness attributed to the maker movement is really all that new and reflecting on its potential pedagogical impacts on teaching and learning."

The interesting points are the one on the tension seen as MakerEd and formal, or traditional, education collide. This is something that I have seen first hand with my work with schools. It is tough to bring teachers to the table to explore new concepts in pedagogy because it is hard for teachers to not feel like they are being pushed into another program that may not be helpful or even supported long term. The pushback is very real and it is something that educators need to be aware of if there is going to be a push to integrate MakerEd into the classroom. 

The other part that I noticed was the idea that MakerEd is not actually a new idea. One of the things I love to point out is how Kindergarten teachers have been Maker teachers longer than anyone. The idea of learning through making and play is ingrained in the PreK and K curriculums around the country. As a society, we recognize the value of this in our early education systems, but move away when it becomes time for college prep or high school prep. The difference between the two approaches can be seen as night and day. One focuses on creativity and learning through the process and the other is more focused on rote memorization and test taking. This approach was great for churning out people to work factories, but it is not helpful in supporting creative minds, problem solving, and critical thinking skills. 

I encourage all of you to take the time to read the article and check out some of the other research on MakerEd to better understand why MakerEd should have a place in schools as we look to a variety of approaches to support a diverse group of student learners. 

Hugs and high fives, 

The Nerdy Teacher