Monday, April 24, 2023

5 Creative Ways to Integrate Adobe Express in Your Classroom #AdobeEduCreative @adobeforedu @rebeccalouhare

Are you looking for innovative ways to engage your students and enhance their learning experience? Look no further! In this blog post, we will explore five different examples of using Adobe Express in the classroom. Adobe Express is a versatile tool that can be easily integrated into various curricular areas and grade levels. So, whether you teach first grade or high school, these examples will help you spark your students' creativity and curiosity. Let's dive in!

Social Studies (Grades 1-4): Exploring Community Heroes

Adobe Express can be used to create an interactive presentation about community heroes. Students in grades 1-4 can choose a local hero (e.g., firefighter, police officer, or nurse) and create a multimedia presentation using Adobe Express. They can include pictures, videos, and text to showcase their chosen hero's responsibilities, their role in the community, and how they help make the community a better place. This project not only helps students learn about local heroes but also enhances their digital storytelling skills.

Language Arts (Grades 5-8): Book Trailers

Students in grades 5-8 can use Adobe Express to create captivating book trailers that persuade their classmates to read a particular book. After reading a book of their choice, students can design a short video that highlights the main characters, setting, and an intriguing plot summary without giving away too much. By incorporating music, images, and text, students can develop their creativity and critical thinking skills while promoting literacy in a fun and engaging way.

Science (Grades 9-12): Environmental Awareness Campaigns

High school students can utilize Adobe Express to create environmental awareness campaigns. They can choose an environmental issue (e.g., climate change, deforestation, or plastic pollution) and design a series of infographics, posters, and videos to raise awareness and encourage action. Students can present their campaigns to their peers or share them on social media. This project promotes environmental stewardship while honing students' digital communication and persuasive skills.

Math (All Grades): Math in Real Life

Adobe Express can be a powerful tool to help students see the relevance of math in their everyday lives. Teachers can create a series of images and short videos showing real-life examples of math concepts (e.g., geometry in architecture, fractions in recipes, or statistics in sports) and challenge students to solve related problems. This approach makes math more relatable and exciting, fostering a positive attitude towards the subject.

Foreign Language (Grades 6-12): Cultural Presentations

In grades 6-12 foreign language classes, Adobe Express can be used to create dynamic and engaging cultural presentations. Students can research a particular country or region where their target language is spoken and design a multimedia presentation that showcases aspects of the culture, such as food, music, traditions, or history. They can include images, videos, and text in the target language, providing an opportunity for students to practice their language skills while expanding their understanding of the culture.

Adobe Express offers a multitude of creative opportunities to enhance learning and engagement in the classroom. These five examples are just the tip of the iceberg, so don't hesitate to explore the platform and discover new ways to integrate it into your curriculum. Remember to encourage your students to share their Adobe Express creations on social media using #AdobeEduCreative to inspire others and build a community of innovative educators and learners. Happy creating!

Thursday, April 20, 2023

Enhance Science Education with Generation Genius Science Kits #ad

Generation Genius Science Kits are a highly effective tool for supporting children interested in Science. These science kits come with a wide range of activities and experiments that cater to specific topics such as electricity, the human body, ecosystems, and more.

What makes these kits stand out is their excellent alignment with Next Generation Science Standards (NGSS), which makes them ideal for use in classrooms, especially for parents who want to ensure that they're providing their children with the most relevant and up-to-date science education possible.


I was able to explore Kit 5 and it had three experiments that were very fun to play with at home. I was able to write a secret message, extract iron from cereal, and create a Sodium Acetate crystal tower! Everything I needed to create the experiments were wonderfully packaged and ready to use. Safety glasses and gloves were provided as well. Safety first! What really made the whole thing work for me was the fact that I was not stuck following paper directions. I was able to watch a video, hosted by Dr. Jeff, that walked me through each part of the experiment. It had an auto-pause feature so the video would stop after each step and ask if I was ready for the next step. I did these with my son and he thought these were cool. Lots of questions about what was happening and why. He dove into the computer to find more information and that is what you hope a Science experiment does for a child. 


Yes, I'm rocking out to NSYNC. :-)

I was very impressed by how nicely everything worked and the quality of materials that was provided. Sometimes monthly kits can cut corners to save on costs, but that is not the case here. All of the materials look like they come straight from a science lab and to your doorstep. Everything was labeled and great care was given to making sure everything is easy to unpack and use. This takes the old school chemistry set to the next level! 


Generation Genius Science Kits are an excellent investment for parents looking for an interactive, engaging, and educational tool for teaching science to their children. With the NGSS alignment, the affordability, and the range of topics, these kits are a must-have for any home that values science education.


Monday, April 17, 2023

Getting Started with Adobe Express: A Beginner's Guide to Creating Stunning Visuals #AdobeEduCreative

Today, we're excited to introduce you to Adobe Express, a powerful yet user-friendly tool for creating eye-catching visuals, perfect for social media, websites, or presentations. With an easy-to-use interface and an extensive range of features, Adobe Express is perfect for both beginners and experts alike. In this post, we'll walk you through one of its most popular features - creating custom graphics. Let's dive in!

Step 1: Open Adobe Express and Select a Template

To get started, head over to the Adobe Express website (https://www.adobe.com/express/) and sign up for a free account. Once you're logged in, you'll find a wide array of templates to choose from. These templates are organized by theme and purpose, making it easy to find the perfect starting point for your design. Select a template that best fits your needs and click on it to open the editor.

Step 2: Customize the Text

One of the first things you'll notice in the editor is the pre-existing text, which you can easily customize to suit your needs. Simply click on the text box and start typing your own content. To change the font, size, color, or alignment, use the options provided in the toolbar above the text box. Feel free to experiment with different styles until you achieve the desired look.

Step 3: Add Images and Icons

To make your design truly unique, you can add images and icons from Adobe Express's extensive library. Click on the "Add" button in the left-hand toolbar and select "Photo" or "Icon" to search for the perfect addition to your design. Once you've found the right image or icon, click on it to add it to your graphic. You can then resize, rotate, or reposition it as needed.

Step 4: Customize the Background

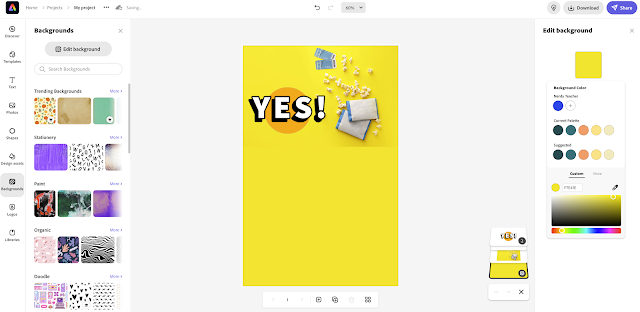
Adobe Express allows you to customize the background of your design with colors, gradients, or even images. Click on the "Background" option in the left-hand toolbar and choose between "Color," "Gradient," or "Photo." You can select a color from the palette, create a custom gradient, or search for a background image that suits your design.

Step 5: Save and Share Your Creation

Once you're satisfied with your design, it's time to save and share it. Click the "Share" button in the upper-right corner of the screen and select the desired file format (JPG, PNG, or PDF). You can also choose to share your design directly to your favorite social media platforms or via a unique link.


And that's it! With just a few clicks, you've created a stunning custom graphic using Adobe Express. Whether you're designing social media posts, website banners, or presentation slides, this powerful tool makes it easy to create professional-looking visuals that leave a lasting impression. So, go ahead and unleash your creativity with Adobe Express!


Monday, April 10, 2023

5 Quick Ways to Enhance Your Classroom Creativity with Adobe Express #AdobeEduCreative @adobeforedu @rebeccalouhare

Adobe Express is a powerful tool that provides a variety of creative options for students to explore in the classroom. From photo editing to social media content creation, Adobe Express offers a range of features that can help students bring their ideas to life. In this list, we will explore 5 quick ways to use Adobe Express in the classroom, including photo editing, digital storytelling, presentations, graphic design, and social media. With these tools, students can develop their creativity, enhance their visual communication skills, and create engaging content for a range of classroom projects and assignments.

1. Photo Editing: Adobe Express is a great tool for editing photos, which can be useful in classroom projects or assignments that involve working with images. Students can use Adobe Express to crop, adjust brightness, contrast, and saturation, apply filters, and add text to their photos.

2. Digital Storytelling: Adobe Express provides a range of creative tools that can help students tell their stories using visual elements. They can use the app to create collages, mood boards, and photo essays, as well as add text and graphics to their projects.

3. Presentations: Adobe Express can be used to create visually engaging presentations. Students can use the app to create slideshows and add text, images, and graphics to their presentations. They can also use the app's design tools to create custom templates and layouts.

4. Graphic Design: Adobe Express provides a range of graphic design tools that can be used in the classroom. Students can use the app to create posters, flyers, and other visual materials. They can use the app's design tools to create custom graphics, add text, and choose from a range of fonts and colors.

5. Social Media: Adobe Express is a great tool for creating social media content. Students can use the app to create graphics and visuals for their social media accounts, such as Instagram, Facebook, and Twitter. They can use the app's design tools to create custom templates, add text, and choose from a range of filters and effects.

Adobe Express offers a wide range of creative options for students to explore and enhance their visual communication skills. By utilizing the various features discussed in this list, students can unlock their full potential as visual storytellers and content creators. With continued practice and experimentation, they can discover new and exciting ways to use Adobe Express to enhance their learning and personal development. Whether they're working on a class project or pursuing their own creative interests, Adobe Express can help students bring their ideas to life and communicate their message effectively.

Thursday, April 6, 2023

Quick! Look at these PBL Tips! #EdChat #MakerEd

5 very quick tips on using PBL in the classroom. 

Start with a clear driving question or problem statement.

The driving question is the heart of any PBL project. It should be open-ended, challenging, and relevant to the students' interests and experiences. It should also be clear enough to guide the students' work, but open enough to allow for creative solutions. The driving question should be introduced at the beginning of the project, and revisited throughout to ensure that students stay focused on the problem they're trying to solve.

Create opportunities for collaboration.

Collaboration is an essential component of PBL. It allows students to work together, share ideas, and build on each other's strengths. Teachers should create opportunities for collaboration throughout the project, such as in-class discussions, small group work, and peer feedback sessions. Teachers should also model effective collaboration skills and help students develop their communication and teamwork skills.

Provide access to resources.

PBL projects require access to a variety of resources, such as books, videos, websites, and experts in the field. Teachers should provide students with access to these resources, either through the school's library or online. Teachers should also help students evaluate the quality of the resources and guide them in their research.

Emphasize the process, not just the product.

The process of PBL is just as important as the final product. Teachers should help students understand the steps involved in the project, such as brainstorming, researching, prototyping, and presenting. Teachers should also encourage students to reflect on their learning throughout the process and provide feedback on their progress.

Celebrate and showcase student work.

Finally, it's important to celebrate and showcase student work. Teachers should provide opportunities for students to present their work to the class, the school, or the community. Teachers should also provide feedback and recognition for students' hard work and creativity. This helps students feel valued and motivated to continue learning.

PBL is a powerful teaching methodology that promotes deeper learning and engagement. By starting with a clear driving question, creating opportunities for collaboration, providing access to resources, emphasizing the process, and celebrating and showcasing student work, teachers can create dynamic and effective PBL projects that help students develop essential skills for success in the 21st century.