Showing posts with label #MakerEd. Show all posts

Wednesday, July 3, 2024

Easy EdTech Podcast Episode with Monica Burns

Hello there! Sending you a note today to let you know where you can learn a bit more about Comics in the Classroom and an AI Connection. I was recently interviewed by Monica Burns for an episode of her Easy EdTech Podcast.

Here’s the description of the episode: In this episode, I chat with Nicholas Provenzano, Makerspace Director, Consultant, and Author, about using comics and graphic novels as powerful literacy tools that provide students with engaging choices for reading and storytelling. You'll also hear fascinating examples of how he's leveraged free generative AI tools to help students collaboratively write stories, generate visuals, and produce digital comics, bringing their creative visions to life.

It’s available on all of the popular podcast platforms. You can listen on your favorite podcast app by clicking one of the links below or searching for “Easy EdTech Podcast.” If you’re not usually a podcast listener but interested in checking this out, you can listen straight from your web browser without downloading anything. 

Here are the links to the episode:

https://classtechtips.com/2024/07/02/comics-in-the-classroom-274/

https://podcasts.apple.com/us/podcast/easy-edtech-podcast-with-monica-burns/id1454190031?mt=2

https://open.spotify.com/show/0qjdB2LMPLMPxOq05ewboe

I can’t wait for you to hear about Comics in the Classroom and an AI Connection in this new episode.

Hugs and High Fives, 

Nick

Thursday, August 24, 2023

The Engineering Design Process #MakerEd @AdobeforEducation #AdobeEduCreative

Hello friends! I wanted to share this example I made using Adobe Express that used Animate from Audio. It is super simple to use! You choose a character, choose a background, and record your audio. Adobe Express does the rest! I wanted to create a short video that explains the Engineering Design Process for my students in design class and this is what I was able to create. My favorite part is the last few seconds where I was able to use Adobe Express to have video running on different layers at the same time. It was just a fun think I wanted to see if I could do and I could! Check out it out below or click this link!


Hugs and High Fives, 

N Provenzano

Monday, April 17, 2023

Getting Started with Adobe Express: A Beginner's Guide to Creating Stunning Visuals #AdobeEduCreative

Today, we're excited to introduce you to Adobe Express, a powerful yet user-friendly tool for creating eye-catching visuals, perfect for social media, websites, or presentations. With an easy-to-use interface and an extensive range of features, Adobe Express is perfect for both beginners and experts alike. In this post, we'll walk you through one of its most popular features - creating custom graphics. Let's dive in!

Step 1: Open Adobe Express and Select a Template

To get started, head over to the Adobe Express website (https://www.adobe.com/express/) and sign up for a free account. Once you're logged in, you'll find a wide array of templates to choose from. These templates are organized by theme and purpose, making it easy to find the perfect starting point for your design. Select a template that best fits your needs and click on it to open the editor.

Step 2: Customize the Text

One of the first things you'll notice in the editor is the pre-existing text, which you can easily customize to suit your needs. Simply click on the text box and start typing your own content. To change the font, size, color, or alignment, use the options provided in the toolbar above the text box. Feel free to experiment with different styles until you achieve the desired look.

Step 3: Add Images and Icons

To make your design truly unique, you can add images and icons from Adobe Express's extensive library. Click on the "Add" button in the left-hand toolbar and select "Photo" or "Icon" to search for the perfect addition to your design. Once you've found the right image or icon, click on it to add it to your graphic. You can then resize, rotate, or reposition it as needed.

Step 4: Customize the Background

Adobe Express allows you to customize the background of your design with colors, gradients, or even images. Click on the "Background" option in the left-hand toolbar and choose between "Color," "Gradient," or "Photo." You can select a color from the palette, create a custom gradient, or search for a background image that suits your design.

Step 5: Save and Share Your Creation

Once you're satisfied with your design, it's time to save and share it. Click the "Share" button in the upper-right corner of the screen and select the desired file format (JPG, PNG, or PDF). You can also choose to share your design directly to your favorite social media platforms or via a unique link.


And that's it! With just a few clicks, you've created a stunning custom graphic using Adobe Express. Whether you're designing social media posts, website banners, or presentation slides, this powerful tool makes it easy to create professional-looking visuals that leave a lasting impression. So, go ahead and unleash your creativity with Adobe Express!


Thursday, February 2, 2023

Student Podcasting with @Soundtrap #MakerEd #PBL #ELA

6th grade students had the opportunity to create their own short podcast episode to share their thoughts on a book they think other should read. These book talks are around 2 minutes long and allowed students to create some intro music using Soundtrap tools. You can find the Podcast, Stevens 6th Grade Ideas, on Spotify

The students set up their Soundtrap account, chose a book they liked from this year and had to record two versions of their Book Talk. The first version was an off the cuff take. They just needed to talk about the book and cover a few common points. The second version required the students to create a script to guide their Book Talk. Once they had both recorded, they were able to choose which one sounded better to them. From there, they created some intro and outro music and let their teacher know they were done. Stevens listened to the podcast episodes and uploaded each one to Anchor which pushes the podcast to Spotify. The lesson took three 70 minute blocks to complete. The first block was a short assignment with Soundtrap that had students create a ringtone so they could get used to the program before embarking on their podcasting adventure. 

Here are a few of the book talks you can listen to from my page, but I encourage you to head over to Spotify and listen to many of them and share them with your students if they are looking for new books to read. 


Thanks for listening and sharing. The students are very excited to share their thoughts with the world. 

Hugs and High Fives, 

Nick

Wednesday, December 14, 2022

A Cutting Board Education #EdChat #MakerEd

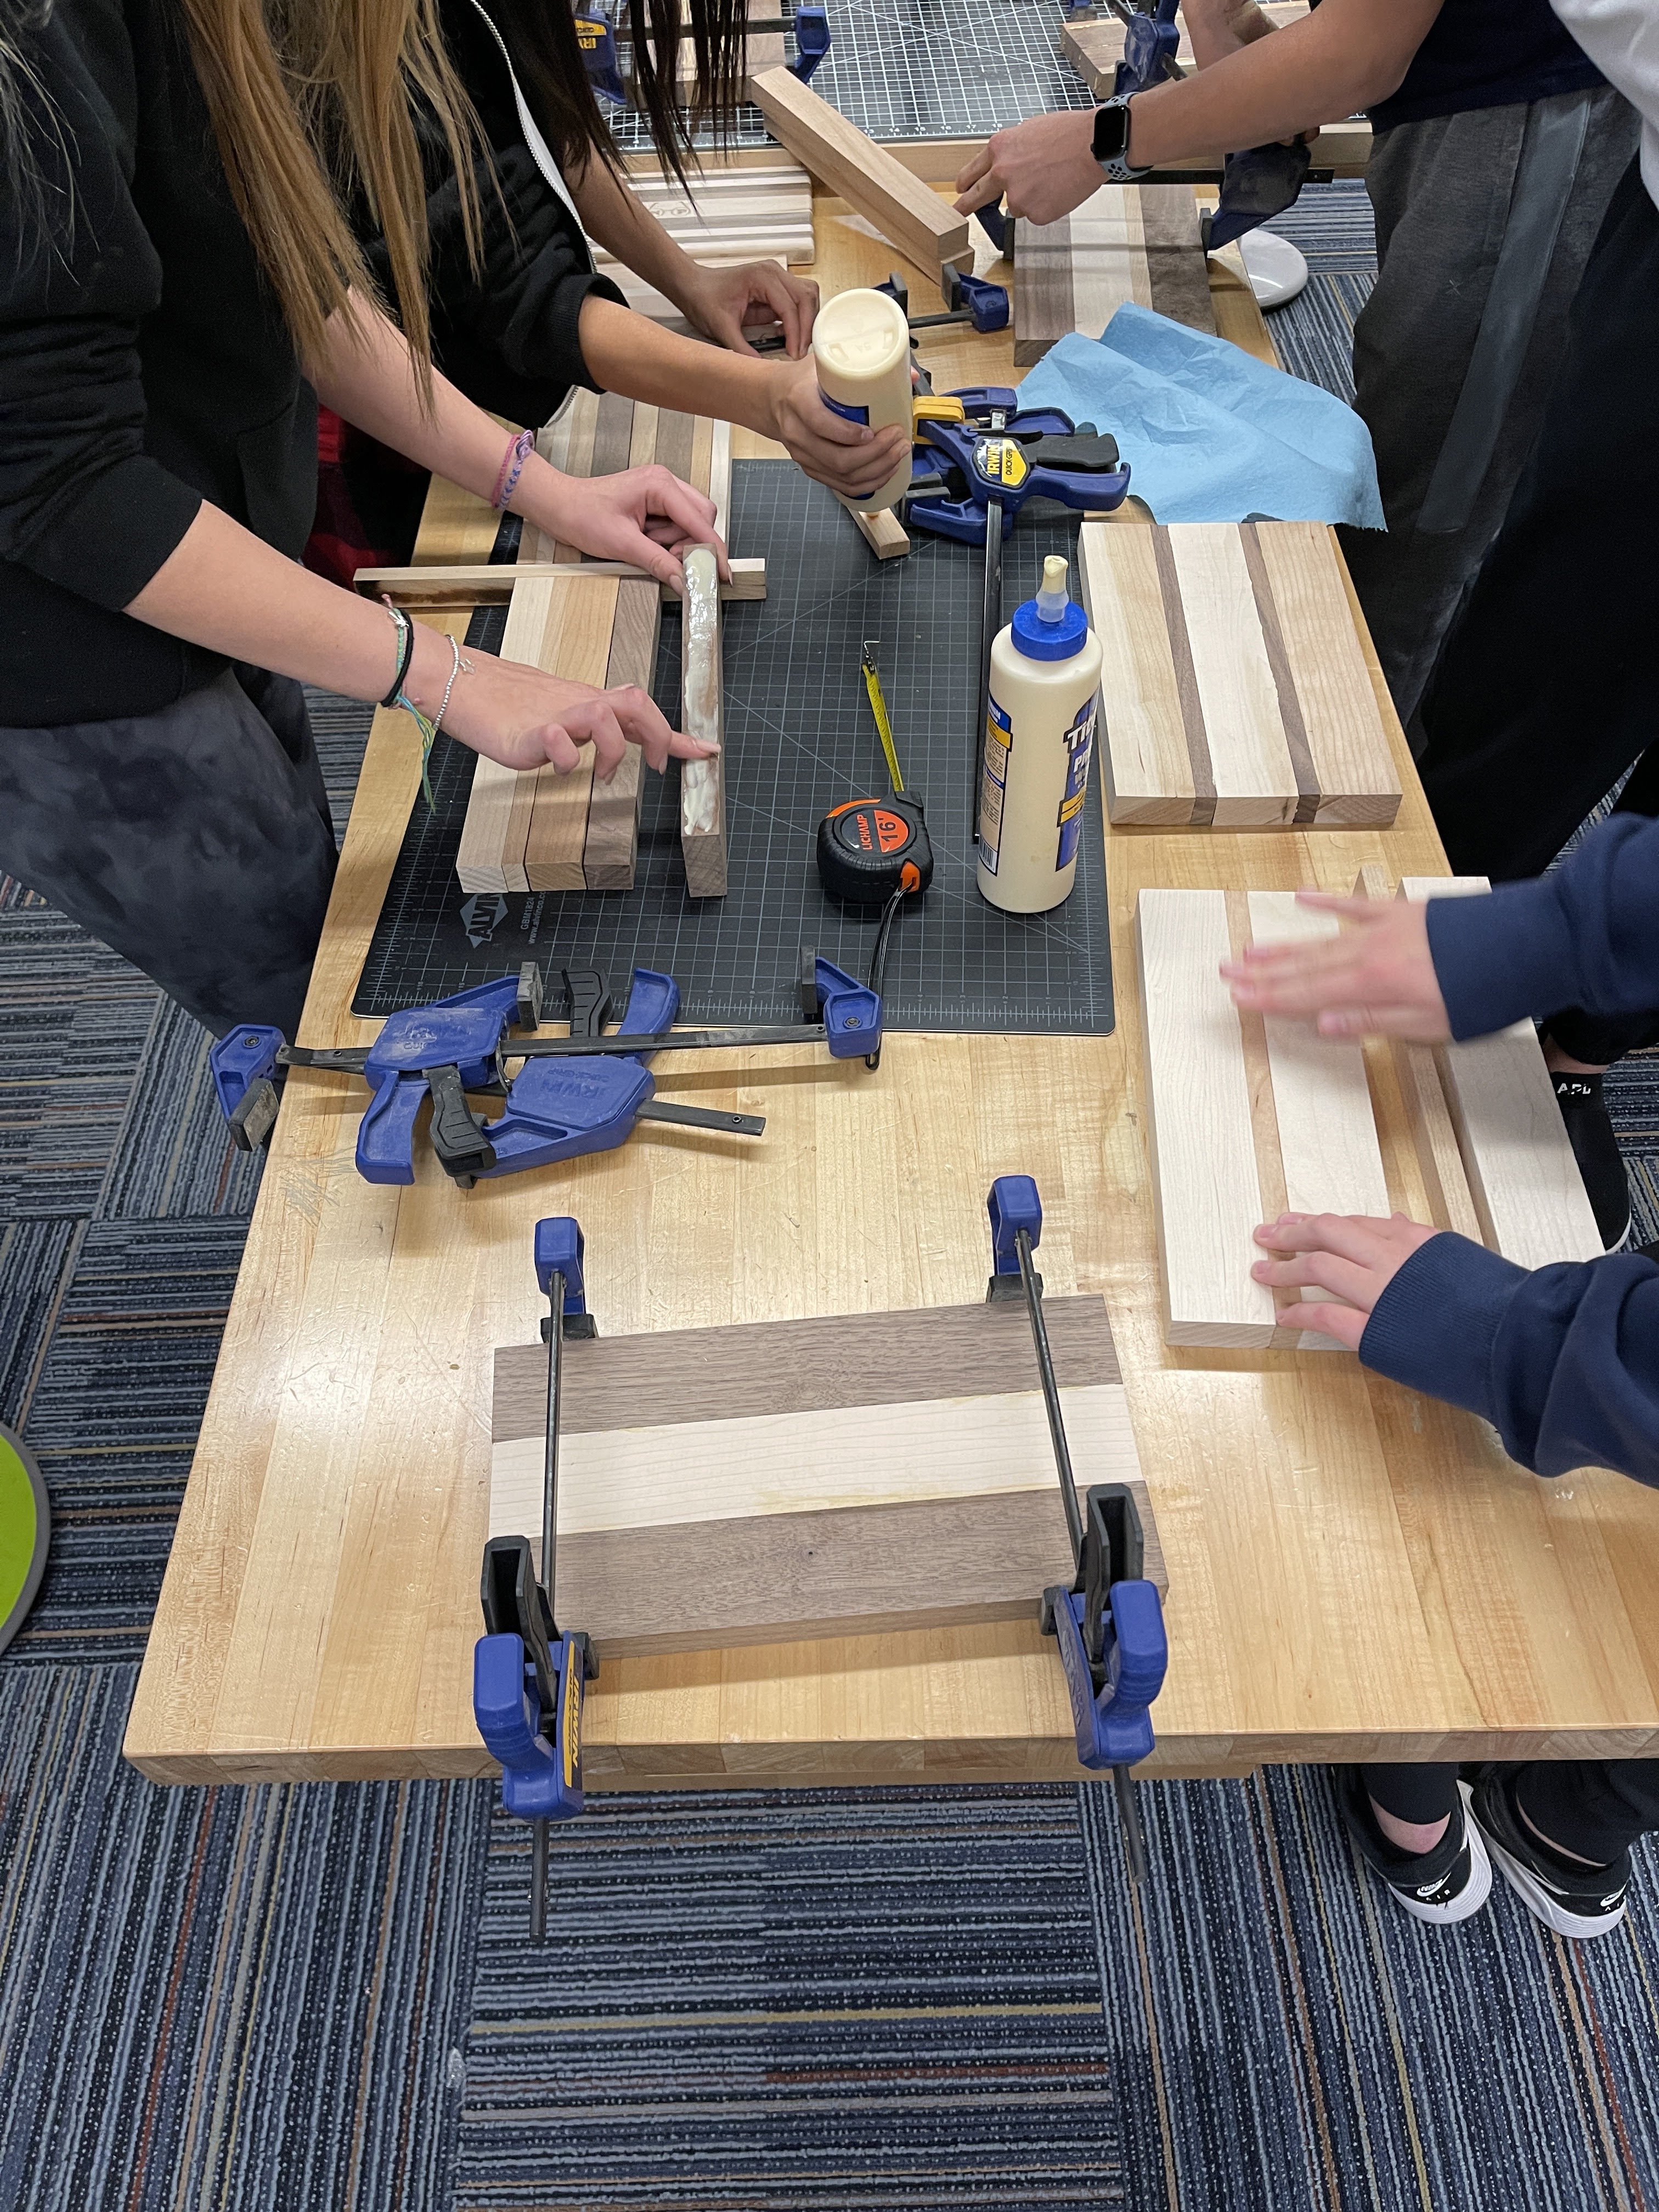
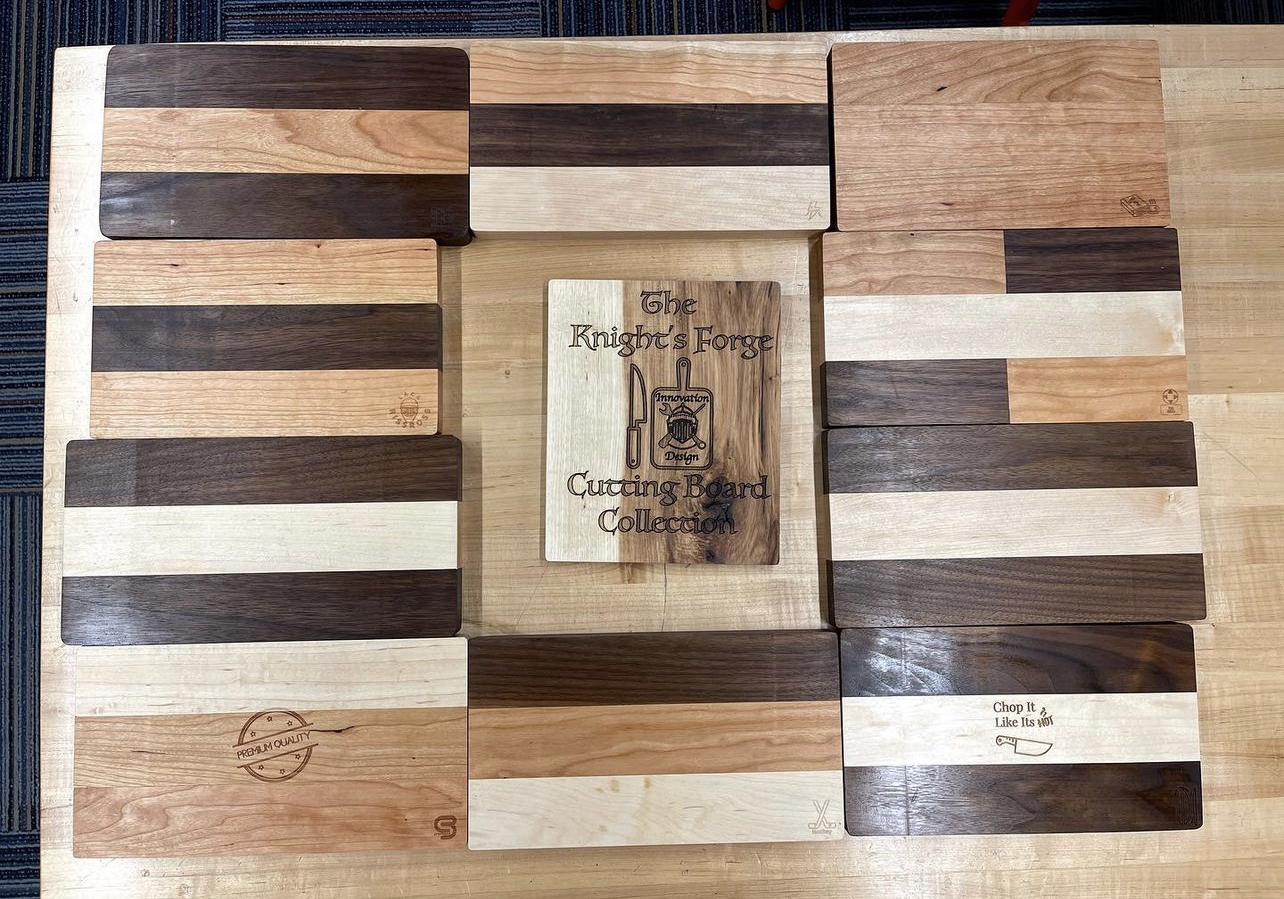
One of the goals for my Level 2 Design class for the 7th and 8th graders was to get them building with their hands. I wanted students to design, measure, cut, and build. One of the easiest ways to do this is through making cutting boards. When it comes to woodworking projects, this is a great beginner project that has kids leave with something they have created and can give away as a gift. Here are some of the highlights of the process. 

Students select their pieces, glue them together, and clamp them in place. What is nice here is that I have a variety of sizes of the wood strips so students can choose a design that works for them. The catch is that the overall board cannot be over 6.5 inches in width. Any wider, and the clamps will not fit. These middle schools will need to work on their measuring and addition skills to make sure the design they want fits in the size constraints. 

Once all of the boards have dried, a couple of students volunteered to help trim the boards. It is another math problem for the students to figure out how much do they need to trim without shrinking the board beyond 11 inches in length. Students then sand the board for a bit with 120 grit sanding block to get rid of any rough edges. 

Next, students will use cutting board oil to seal the boards and make them food safe for use. Students need to measure the correct amount to use for the board. Once the boards are oiled, the students wait for it to dry and can take it home the next day. 

For this projects, students are using a mitre saw, planer, glue, and some boards I ordered from Amazon. People ask me what do students learn in a Maker focused class and there are different answers for different projects. When it comes to cutting boards, students are using those math skills they have learned over the years and are also learning some basic principles of design and building. 

This is a project that I think would be an amazing addition to a math class exploring geometry. It would take some prep on the teacher's part, but it could be a fun project that gets kids thinking about shapes in a different fashion. 

This is not for everyone, but I though I would share for those looking for something different. 


Hugs and High Fives, 

N Provenzano


Monday, September 12, 2022

Cutting Board Challenge #MakerEd #AdobeEduCreative

We are starting the school year with some fun challenges in our Innovation and Design Level 2 class. I really want to focus on physical making with digital making as a support and design tool. Our first project will be using Adobe Creative Cloud Express to create their own logo. From there, we will use the laser cutter to put their logo on a keychain. Here is my example I will be using with the students,


From here, students will be design their own themed cutting board. I was able to get a bulk order of 5"x8" bamboo cutting boards for the class from Amazon. Students will design a PNG in ACCE and we will use the laser cutter to etch the design. Their logo will go on the back. Once they have created their cutting board, they will need to create an ad for it. Here is my example,


One of the things I trying to do this year is not make my examples over the top. I spent lots of time on other examples in the past and I had students say they would not be able to match my example. I think that impacted their effort. For first time project examples, I'm going to scale back the examples until I can use student examples. 

All of these examples and projects will live in their portfolio on Seesaw. By the end of the trimester, I hope to have each student with a collection of their design work. 

Feel free to share some thoughts and ideas on how I could tweak this to make it better. I appreciate all of the feedback. 

Hugs and High Fives, 

N Provenzano

Monday, May 9, 2022

Podcast Design Project #MakerEd #AdobeEduCreative

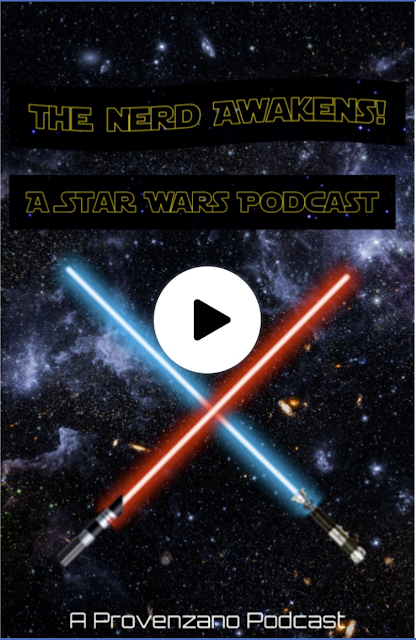
Hey folks! I wanted to share a fun project that I have assigned my students that uses Adobe Creative Cloud Express and Seesaw. Students will use ACCE to create an ad for a fake podcast they will create. Below are the directions for the assignment. 


For this activity, you can partner up if you'd like to create an ad and a sample of what your podcast would be about. Follow the steps below to complete the activity. Step 1: Decide whether or not you want a partner for this activity. Step 2: Brainstorm possible idea for a podcast topic that you think people would find interesting. Step 3: Come up with a script for a short clip of this podcast. It should be around 3-4 minutes in length. Step 4: Design an ad to promote the podcast using images that connect to your script. Step 5: Create the ad in Adobe Creative Cloud Express. (express.adobe.com) Step 6: Post the ad to Seesaw and record the podcast clip on the same page. Step 7. Post the script you wrote for the clip. Podcast Ad Requirement: Name of the podcast. Images that connect to the topic of the podcast. Names of the people hosting the podcast.

Here is a link to the assignment that has my example.


The students dove in and I can't wait to share the work they have created for the podcast assignment. 

Hugs and High Fives, 

Nick


Monday, May 2, 2022

Ugly Stuffy Project #MakerEd

I've been looking for a new project for students this trimester and I was just at home thinking about the different things I wanted students to do. I knew I wanted them to make something with their hands, but I wanted to make it silly and ok if they were not "good" at it from the start. It was while I was watching Antman and the scene where he gave his daughter the creepy doll struck me. Ugly Dolls are are a thing and I think they can be a pretty simple project. I jumped online, found a bunch of videos on how to make these dolls and set to work ordering supplies and giving it a try myself. This has been a fun project because the Stuffys are supposed to look off and ugly. No mistakes, only features. Even in my demo I made that you can see below. I thought the fangs would be cool, but I made them too thin to sew and I didn't have the fabric glue. I pivoted and used excess fabric to make a mouth. It turns out I made plankton from Spongebob Squarepants, but I made him on my own. I just tasked the students with making an Ugly Stuffy, but I could give them more guidance and ask them to create a symbol of a feeling or something like that. There are lots of possibilities with a project like this. If you are looking for a project that will take a couple of days and get the students crafting with their hands, give the Ugly Stuffy project a try. 

My Steps - Made with Adobe Creative Cloud Express

Supply List

Poly Fil 

Embroidery Floss 

Scissors

Felt

Buttons

Needle Threaders

Glue

Large Needles

Students got to work and some had sewing experience and were able to help me and others do a better job. Here is a collection of photos from my Instagram account. 


Follow along on my instagram to see the Ugly Stuffys that students finish this week. 


 Hugs and High Fives, 

The Nerdy Teacher

Thursday, March 24, 2022

Connections #EdChat

It has been a couple of weeks of first for me this month. I went to my first in person conference in two years. For the first time in a couple of years I got on a plane to visit a school to support their work with PBL and MakerEd. It has been a very weird experience. As I reflect on what stands out most to me about these experiences it is pretty simple, Connections. 

I was excited to see so many friends at MACUL last week. These are people I hold dear to my heart and we have not been able to connect in person for so long. Sessions were great, but the connections with my friends are what really stood out. Connecting virtually is nice when you have to, but connecting face to face, that is something that is so very special. It didn't take very long for a group of us to be sitting around a table sharing the new tools we are using or the lessons we are trying out for the first time. We are friends, but we are educators always looking to share and learn as well. Those connections were so invigorating for me. I left the conference full of energy and new ideas that I was excited to share with as many people as possible. 

I am in Jacksonville, FL this week working with Assumption Catholic School on their move to a PBL focused pedagogy with an infusion of MakerEd. I've been working with them this school year virtually and this is the first time I've been able to come to the school and check things out. I have been able to visit classrooms and see teachers in action. I held an after school session for staff and talked about PBL and what it can look like for teachers and for the students. I was able to hear their stories and be inspired by the work that they are doing every day. Again, at the end of the day, it was all about the connections. Talking to these great educators has been nice and it has helped them get started on their great work, but connecting in person is boost for everyone. Deep down, we all want to connect in some way. Seeing the students have so much learning about headline writing in social studies or exploring poetry in ELA makes me so happy because the kids were so excited. 

I loved be able to present in person and see the reaction of the staff as I told stories. As a presenter, I have missed being able to "read the room" to see if I should spend more time on a topic or move a long. That connection that happens in the room if you are doing it right is so amazing and I didn't realize how much I missed it until I did for the first time after a two year break. 

There are many great benefits to learning virtually and connecting online for PD, but nothing can ever replace the value of connecting face to face with friends and friends you haven't met yet to support your learning. I look forward to a busy Summer presenting in person across the country. Please take a moment and stop and say hi if I come to your event or you see me at ISTE. I'd love to connect and learn with you. 


If you are looking for PD and support as your school explores PBL and/or MakerEd, reach out to me and we can see how we can connect to make that happen. 


Hugs and High Fives, 

Nick

Thursday, March 17, 2022

#MakerEd and Wellness #MACUL22 #SEL

One of the things that people ask me about MakerEd is how does it support student wellness. Social Emotional Learning is becoming a very hot topic in education. For those of us who have been around for a while, we have always known the value of making sure students' Social Emotional needs are being met because they cannot learn unless they are. MakerEd is one of many different ways to engage students in learning and also support SEL. 

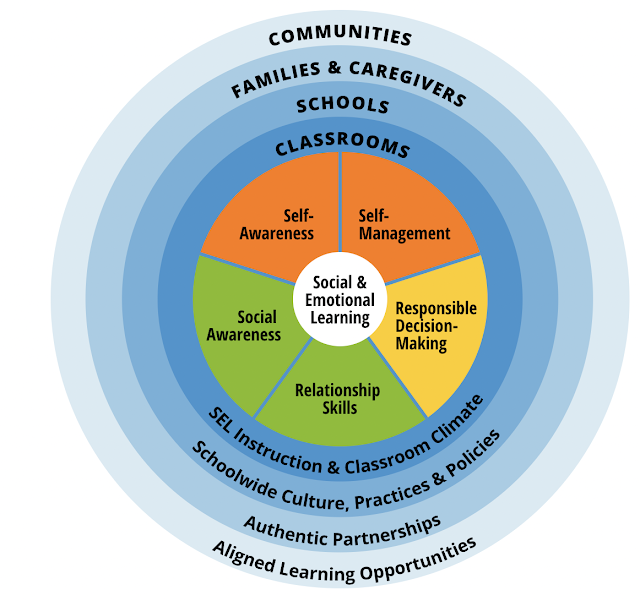
From CASEL.ORG

When we look at the framework of SEL created by CASEL, we can see that there are elements that link directly to what good MakerEd lessons and projects incorporate. Let's take a look at Responsible Decision-Making and Self-Management. 

When students are working on MakerEd projects, I emphasize the value of making good decisions about how they are going to structure their work time and how they are going to plan their project to make it possible to complete in the time allotted. Learning how to manage time for projects and how to make those decisions on their own are important skills for students to work on in school. Understanding that they will make mistakes, it is important to give them the space to make them and then coach them to learn from them and be better for the next time. 

Group projects can be messy, but it is important to work on relationship skills in class. It is important to have students work with a wide variety of peers to help them understand where everyone in a group is coming from so they can grow as learners and people. Not every project should be a group project, but there should be opportunities for students to come together and work on a project that allows multiple ideas to come together to find a solution. 

Projects can allow for students to think about the world they live in and how they fit in it. They can explore problems and consider the ways that they can help solve them on their own or with the support of others. SEL is not something that can be simply thrown into lessons and expected to make the mental health of all students better. It takes time and serious considerations to make sure that SEL is included in planning in a thoughtful manner. I've yet to find a worksheet that supported student SEL as effectively as a well crafted project. 


Tuesday, March 1, 2022

Reflection as Assessment #MakerEd #EdChat

One of the things that I am often asked is how I assess MakerEd work from students. The traditional education system is still grade focused. Students are taught from a very young age to chase the grade because that is what matters in the end. 

Getting students to understand that there is more to school than grades requires serious retraining on the teacher's part. It is not impossible, but it is not easy. One of the ways I have helped my students explore learning and MakerEd in my Mechanical Engineering class is the emphasis we place on reflection.

Each unit is a challenge that students need to complete. They can design their own solutions based on their research and there are goals they are trying to reach, but they are not assessed, or graded, on if they reach those goals. Their assessment is how they reflect on their work in the challenge. Here is one example, 

Students are tasked with building a bride using glue and no more than 200 craft sticks. Their bridge needs to be able to support at least 100 pounds. They will do the research and design a bridge they think will best accomplish this goal. When the bridges are done, we take the total sticks used and subtract that number from the total weight it held. The group with the highest number at the end won the challenge. 

When they have completed the testing and reviewed all of their work and the work of other groups, they are given a reflection sheet. The reflection asks students to explore why they were or were not successful. Their ability to be critical of the work, or lack there of, they put in is important. The first reflections are often the toughest for students because they are hesitant to be critical of their own work thinking it will lead to bad grades. In reality, the students that dive deeper and are critical of their decisions get the most out of class.

My job during the project time is to be engaged with the students, advise them on their choices as they work, provide feedback on their process, and support their overall needs while working. After the reflection is submitted, my job is to provide my thoughts on their thoughts. It starts a conversation about their learning process. As we move through the semester, I have found that some students are too hard on themselves and sometimes do not recognize the successes they had in the project. Students are still very new to the reflection process so I need to support them as they learn to highlight the wins and understand the loses. 

At the end of the day, I have to place a grade in the grade book. The students earn their grade through reflection and dialogue. These reflections are saved and explored at the end of the semester where they are asked to show the growth points in the class. If we truly want growth for our students, you can't have it without reflection. It is a shame that reflections tends to be the first things skipped when we run out time. 

How do you use reflection in your classes?

Thursday, February 17, 2022

Breaking A Few Eggs #MakerEd

One of the things that I have always loved about MakerEd is the mistakes that are made along the way. Mistakes are an important part of the learning process, but grades have made them feel way worse than they should be. The best metaphor for this is the egg drop project my 6th graders work on for Innovation and Design. 

Students are given a bag of supplies and are tasked with making a vehicle that can protect an egg from a one story drop from a balcony. Students work to design and build their vehicle and are even given some plastic eggs to use a test dummies for practice drops. However, when it comes time to drop the real egg, some students are scared. They do not want to see a broken egg. Even though they will not receive a bad grade for a broken egg (my class does not have grades) and they will be given a chance to redesign and drop a second egg, some of those students are hesitant to drop because of what failure will physically look like; a destroyed egg. 

Some students love the idea of dropping an egg and seeing a very real success or failure. The binary way of looking at it works for some students. If it broke, they need to figure out how to fix the mistake so the next egg doesn't break. If it is unbroken, they are reassured that their design worked. While not every assignment or project is as clear as this, it is a nice way of looking at work students do in school. 

If the egg breaks, just have another go at it and try to get it right. That approach works for every assignment. I ask students to not be afraid of a broken egg. Just go for it as long as they commit themselves to finding out why the egg broke and work to make sure the same mistakes do not happen again. With that approach, a few broken eggs will be expected and students will not be so hesitant to try. 

Mistakes are how we learn and we want students to be more comfortable with them. Sometimes is takes a few broken eggs for them to see this. 

Tuesday, February 8, 2022

Recovery with #MakerEd

It's been a bit since I have shared anything on the website and that is because I have been recovering from a cardiac event. 

tldr; Had a serious heart event. On the mend now thanks, in part, to the calming nature of making.

Over a month ago, I experienced right chest pain and arm tingling after a workout. Decided to go to ER, but almost turned around because it felt better.

Decided to go in since I was there. I was able to be seen right away and they did some tests. Blood tests showed high Troponin levels. These are high if you’ve had heart trauma. 0-80 is normal. I was at 800, then 3,400, and then 32,00.

They called in the cardiac team and rushed me to the Cath lab to stick a line in my wrist to my heart to figure out what was going on because other tests showed I was supposed to be ok. Turns out I suffered a rare SCAD event.


These events are extremely rare in men. It’s why all of my symptoms and tests were confusing. I was placed on blood thinners and other meds to prevent clots and other nasty things. I stayed in observation for a few days before another Cath visit to see if I’m healing.

The 2nd Cath showed things were going in the right direction. My Triponin levels were dropping and no signs of clots. I was able to go home after 5 days and I saw my cardiologist. I was given two weeks of bed rest to heal. During that time, I spent lots of time making things. I did lots of doodling and spent time with LEGO kits. I needed to do something, but also keep my blood pressure down. I fell back to the things that I loved. Playing with Python code, exploring Raspberry Pi projects, designing in 3D, and other maker outlets was a great way for me to keep my mind active, be creative, but also take it easy. There are great studies out there that support creativity and its positive impact on mental health issues. Here is one by Connor, DeYoung, and Silvia "Everyday creativity activity as a path to flourishing". There are others worth reading if you are interested in going down that rabbit hole like I did. 

I will have missed 3 weeks of school by the time I came back. I will be on blood thinners for the next three months and I could not come to #FETC22 or #TCEA22. I have been looking forward to these events because I have missed seeing so many of my friends in person. My mental health took a major hit when I realized what I was going to miss. Making helped me deal with my emotions during this time.  

I started cardiac rehab last week and look forward to a return to normalcy as I build back endurance.

I look to be right as rain by the Spring and I’m excited about my Summer opportunities that have started to emerge. #ISTE in NOLA will be great. I can't wait to see all of you after a couple of years away. 

The last thing I want to share is to tell you to listen to your body. Get that thing checked out. I was lucky the ER was not slammed for the first time in 9 months and I was seen right away. If I had to wait, I might not be here. Take care and I hope to see you soon.

Hugs and High Fives, 

NP

Thursday, December 16, 2021

Demco and the #MakerMinute @Demco #DemcoMaker

Hello everyone! I'm excited to share an awesome partnership with Demco that will share maker tips across social media. There are so many things I do in my space that make life a little easier and I wanted to find the best way to share them with as many people as possible. 

For those who do not know, I have been collaborating with Demco for a number of years. I worked with them on the design and build out of the makerspace at my school and I have used them for lots of supplies to support students in the space and my design classes. Please check out what they have to offer if you are looking to restock your space. I also have been writing posts for them since 2018 about various Makerspace and STEM ideas. The Maker Minute is our next collaboration and it has been a blast so far. Check out what we have shared,

I firmly believe that we are all better together, so please share some of your tips and tricks for #MakerEd or your classroom using the tag #DemcoMaker and tag me, @TheNerdyTeacher. I want to share these with everyone out there. This has already been a long year and we need to help each other out in any way possible. I hope these tips can make things a little easier. 

Wednesday, December 8, 2021

Sharing @FlexFarms Hydroponics In The Classroom with @Adobe Premiere Rush #EdChat #SciChat

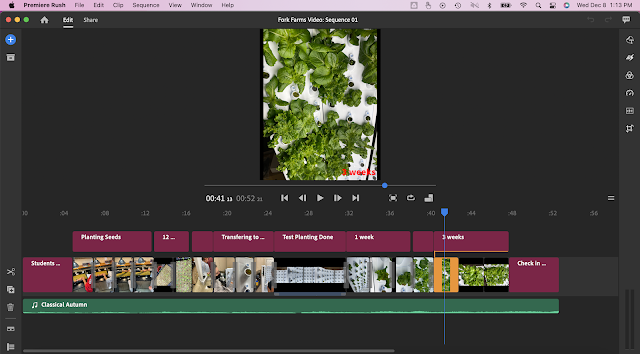
After three weeks of working with the Flex Farm from Fork Farms, I was able to put together this video using Premiere Rush from Adobe. I was able to take the photos from the past three weeks and add them to the application. I was quickly able to add transitions, title slides, and music. The music options were amazing. I could type into the search bar and there were so many different options for music. I discovered that they have tons of sound effects as well. I was flooded with ideas after hearing some of them. I could create some very fun videos in the future now that I have access to this amazing library of sounds. 

When I was done, I exported as an Instagram video and it formatted everything for me in an instant. The file was saved on my computer and the files are in the cloud. 

I think there are so many parts of Adobe that people do not explore because the assumption is that they are too difficult to learn to do something simple. There is still plenty for me to learn using Premiere Rush, I was able to create something that was able to share what we have been doing in our school with the Flex Farm


Here is a quick look at the workspace of Adobe Premiere Rush. I love a simple and clean UI. Too many tools always overwhelm me and PR does not do that to me. I wish I would have tried using it sooner. 


Here is the finished video showcasing the growth over the course of three weeks using the Flex Farms. 

If you have any questions about using Adobe Premiere Rush or how the Flex Farm could work in your learning environment, please feel free to reach out to me. 

Hugs and High Fives, 

NP

Friday, December 3, 2021

Visualizing Growth with @Seesaw and @AdobeSpark #PBL #AdobeEduCreative

One of the things that I have advocated for when talking to people about Project Based Learning is the need to reconsider how we assess growth. As an ELA teacher, one of the most common practices was the manila folder where students would keep their assessed writing. The idea was that they could go back and see how they have grown from one essay to the next. Another traditional format is asking students to keep a binder of everything they have done in class and hope their water bottle doesn't explode in their bag or lose it completely. 

Those are traditional examples of portfolios that many of us have used for years, but maybe never actually called a portfolio. As I shifted more to project based learning and created my design classes for 6th-8th grade, I needed a way to assess student work that also allowed them to hold on to it and see their own growth over time. Adobe Spark and Seesaw have been two apps that have really helped me accomplish both of those objectives. 

As a school, we use Seesaw as out main portfolio tool in the Middle School. I like it so much, that I also use it with my high school Mechanical Engineering class. It allows for teachers to create classes, create activities in those classes, and it allows for students to post their work to those activities to demonstrate their understanding of the material covered in the activity. What is really nice about Seesaw is that is allows for video uploads, image uploads, and recorded annotation. Students can spend multiple classes creating a project and then upload images of their work to the Seesaw with a provided narration that explains what they did and how that demonstrates their understanding. I have found that by adding Adobe Spark to the mix, you can take the portfolio to the next level. 

Adobe Spark is free to all students and allows for the creation of images, slideshows, and websites. All of it is hosted and stored on their account. They can download their content and use it as needed. What I love about Adobe Spark is that it gives students access to amazing creation tools that have normally been reserved for art departments or design departments. I have students that love to use Adobe Spark to create different templates and styles to showcase their work and then they upload it to Seesaw. Some have used websites to store all of their work as they progress through the trimester and share the link on Seesaw. Adobe Spark adds an element of versatility to the use of portfolios in the classroom. 

Due to privacy issues, I cannot share any of the work that students have created with all of you, but here is some of the work I have done using Adobe Spark to give you a sense of what it looks like. This is template I created in Adobe Spark that students could use if they wanted to showcase their work at the end of the marking period. You can make your own copy of this template by following this link to my library of templates. 


What I think is most important is helping students understand the value of looking at growth over time. Where have they started and where are they now. It is so important to remind students that everyone is on their own learning journey and are at different points than their peers. Having a portfolio that allows students to truly see their growth is a wonderful way to keep the hopes up for those students who might feel like they are not where they should be in class. Using Seesaw and Adobe Spark has really allowed for some great conversations with students about growth. I will continue to be an advocate for project based learning in the classroom because I have seen how it impacts student learning. Seesaw and Adobe Spark are just more resources that showcase how important PBL can be. 

If you have any questions about Seesaw, Adobe Spark, or Project Based Learning, please reach out on my social channels. 

Hugs and High Fives, 

NP

I am an ACE Rewards Program member with Adobe.

Tuesday, October 26, 2021

The Ed of #MakerEd

When MakerEd is talked about, there is a heavy focus on the Maker part and not so much on the Ed part. I know I am guilty of this. I think it has lots to do with the fact that the Maker part is something that is easy to share. I can showcase the thing I built or the projects the students have built, while the education part often goes unseen. As I've been thinking about MakerEd and how important it is for schools to explore and integrate the ideas into their learning culture, I wanted to make sure that I share the education side of MakerEd in the hopes to convince more people of the value of this approach in the classroom. Part of that is looking at the research and I found a great website that has links to a variety of educational studies that explore the impact on MakerEd in the classroom. 

Makers Empire is a company that makes a 3D design software that supports digital making. Through their website, I found a page dedicated to MakerEd research. Check out the Research page here. There are lots of great articles and links here, but I wanted to share some that stood out to me. 

Here is a wonderful article on The Maker Movement in Education. It was published in the Harvard Educational Review and here is a synopsis,

"In this essay, Erica Halverson and Kimberly Sheridan provide the context for research on the maker movement as they consider the emerging role of making in education. The authors describe the theoretical roots of the movement and draw connections to related research on formal and informal education. They present points of tension between making and formal education practices as they come into contact with one another, exploring whether the newness attributed to the maker movement is really all that new and reflecting on its potential pedagogical impacts on teaching and learning."

The interesting points are the one on the tension seen as MakerEd and formal, or traditional, education collide. This is something that I have seen first hand with my work with schools. It is tough to bring teachers to the table to explore new concepts in pedagogy because it is hard for teachers to not feel like they are being pushed into another program that may not be helpful or even supported long term. The pushback is very real and it is something that educators need to be aware of if there is going to be a push to integrate MakerEd into the classroom. 

The other part that I noticed was the idea that MakerEd is not actually a new idea. One of the things I love to point out is how Kindergarten teachers have been Maker teachers longer than anyone. The idea of learning through making and play is ingrained in the PreK and K curriculums around the country. As a society, we recognize the value of this in our early education systems, but move away when it becomes time for college prep or high school prep. The difference between the two approaches can be seen as night and day. One focuses on creativity and learning through the process and the other is more focused on rote memorization and test taking. This approach was great for churning out people to work factories, but it is not helpful in supporting creative minds, problem solving, and critical thinking skills. 

I encourage all of you to take the time to read the article and check out some of the other research on MakerEd to better understand why MakerEd should have a place in schools as we look to a variety of approaches to support a diverse group of student learners. 

Hugs and high fives, 

The Nerdy Teacher

Wednesday, October 13, 2021

Mistakes As Part Of The Process #PBL #MakerEd #PBL

It is so tough trying to convince students that mistakes are part of the process of learning. I have found that the older the students are, the more fearful they are of mistakes. The same is true for teachers as well. 

It took me so long to be comfortable to make mistakes in front of my students. As teacher who has dyslexia, writing on the board caused me tremendous anxiety because I was afraid to spell things wrong. As an English teacher, it was very embarrassing. Students seem to never pass on a chance to point out a teacher error. I would turn bright red and correct the mistake. I would be anxious the rest of the day. The only way to overcome this would be up front with my dyslexia with the students and let them know in advance that I will be making mistakes and mistakes are ok as long as we are willing to learn from them. The first year I did this, students were super accepting. Some even said they deal with the same issue and it was nice to see a teacher be honest about it. It lifted a weight off my shoulders and some weight of the shoulders of my students. 

I decided to extend that approach to admitting to mistakes to all parts of my class. Telling students that there are going to be times where I misspeak, say something incorrectly, or I might be flat out wrong. Being wrong is just part of the process. I don't know everything, I don't expect them to know everything, and we will support one another when we make mistakes in class. By focusing on creating an environment where mistakes are ok by modeling what that looks like, students felt more comfortable making those mistakes. 

Students in my design class were reflecting on a project and a student was really hard on themself for doing their design over multiple times because it was not working they way they wanted. They thought that was a negative thing and I had to remind them it was the opposite of that. Going forward with a design you do not think is right is way worse than going back to the drawing board multiple times. It shows that you are committed to getting it done correctly and not just getting it done. 

The fear of making mistakes and the fear of failure is very real. The first step that teachers can take to create an environment that supports failure and mistakes as part of the process is to admit to the class that they will make mistakes. After that, it is supporting students when they make their mistakes and guiding them through the process of reflecting on those mistakes and how they can learn from them. 


Hugs and High Fives, 

The Nerdy Teacher

Wednesday, April 7, 2021

Who is an authority in STEAM? #MakerEd #PBL #EdChat

 There was a tweet sent out by an awesome educator, Scott Nunes, that sparked an interesting sharing of ideas. 


 This was a follow up question to the tweet,


These ideas really had me thinking. For the first question on who is an authority on STEAM, some people responded by naming people they thought were an authority. I took it the question as something a bit more abstract. More of "what makes someone an authority on STEAM".  You can find my thread here, 


Overall, I think the A in STEAM covers the humanities. I think ELA is in STEAM. I think social studies is part of the A in STEAM. I think STEAM is school. Because of that, I do not believe there is anyone that can claim to be THE authority on it. I think there are people that bring tons of knowledge to the STEAM arena, but it is next to impossible to be THE authority. Being an expert in STEAM doesn't make you an authority on it either. I do not have experience in urban/rural STEAM, but there are those that do. How can I be an authority in STEAM for those areas where I lack experience? I have written books, spoken internationally, and worked with schools from across the country on MakerEd, STEAM, PBL, and other topics. I have learned from every group I have worked with over that time. While I think I can help educators on their learning journey, I do not have all of the answers and can't claim to be the THE guy in these areas. Everything I have learned has come from experience and what others have done before me. I am lucky that I have the opportunities to share that learning with others and I make sure to connect people with others that can be more helpful than me. It's important to know that you don't know everything. That is how we grow. 

Ultimately, I warn everyone to be wary of anyone that claims to be THE authority in any field. It suggests that they have very little to learn from others and that is not someone you want to bring into your school/district. 

What are your thoughts? What makes someone an authority on anything? 

Friday, March 26, 2021

Makerspaces in a post COVID world #MakerEd #PBL

As March comes to a close, some schools are starting to think about what the 2021-2022 school year is going to like for their students. One of the things that I hope sticks around is how many teachers embraced Project Based Learning as a strong pedagogical approach to learning during the pandemic. I have been lucky to work with different teachers across the the country that have embraced PBL and have seen the benefits it has for their students. The big questions is, "How do we maintain this positive movement into the next school year?" I think this is where an investment in makerspaces can be a great idea. 

If your school has embraced PBL, focusing on creating a space that supports these teachers and students is a wonderful way to keep the momentum. With teachers and students being able to work more closely next year, there will be a surge in possible project ideas that need to be supported. Having a dedicated space that would allow for a wide variety of projects would be great. By adding tools to a space, teachers will be able to expand the possible project offerings to students. If students have more freedom to choose their projects, having access to a larger variety of tools will help bring equity across the board. Having worked with schools that have built spaces to support PBL, I know what it is like to see students and teachers become more engaged in the process of learning with the addition of these learning spaces and the tools in them. Striking while the iron is hot is crucial. 

If you are a teacher that is excited about the strides you and your colleagues have made during the pandemic and you want to keep the great work going, I suggest you explore the plausibility of makerspaces in your school. There is so much that can be done to support students and their ideas when they have access to a makerspace. Some schools will look at the 21-22 school year as a chance to return to "normal". Other, more progressive schools, will look at the 21-22 school year as a chance to fix some of the problems that became glaring during the pandemic. Dedicating time and resources to support a positive change in instruction and learning is the best thing we can do moving forward. I have seen what a makerspace can do for students pre-pandemic and I know it will be a difference maker post-pandemic. 

If you are interested in exploring makerspaces and have questions, I'd love to connect and help in anyway that I can. If you have worked on setting up makerspaces, I'd love to connect and see what we can learn from one another. 

Have a wonderful day everyone!